User Guide

Welcome to NotionUS
NotionUS is a lightweight but powerful application that can help you manage your assignments and tasks. It sports a sleek and minimalist design which allows you to clearly see your outstanding tasks at a glance.
NotionUS operates via a command line interface which aids fast typists in managing their assignments quickly, while still providing the benefits of a graphical user interface.
NotionUS excels in its simplicity and optimisation for the university student’s task management needs. Upon download, it supports management via deadlines and university modules. Having a gentle learning curve and requiring minimal setup, it is perfect for the contemporary university student.
The following is a short overview of the features and capabilities of NotionUS:
- Creating tasks with specified modules, deadlines and tags.
- Marking and unmarking a task as done.
- Filtering tasks by name, module, deadline, tags and completion status.
- Finding specific tasks by name or tag.
| If you are | You should |
|---|---|
| a new user | proceed to our quick start section to set up NotionUS and try its features |
| returning user | skip to our command summary for a summary of our features! |
Table of Contents
- Welcome to NotionUS
- Quick start
- GUI Features
-
Command Features
- Command Structure
- Getting help :
help - Task Management
-
Viewing Specific Tasks
- Listing all tasks :
ls -a - Listing all unmarked tasks :
ls -u - Listing all marked tasks :
ls -m - Listing all tasks under the same module :
ls --module - Listing all tasks containing the same tag :
ls -t - Listing all tasks with deadline on or after a date :
ls -d - Listing all task names with the matching keywords:
ls -n - Find task names or tags:
find
- Listing all tasks :
- Archive Management
- Exiting the program :
exit
- Other Features
- FAQ
- Command summary
- Glossary
Quick start
- Ensure you have Java
11or above installed in your Computer.- To check if you have Java installed, please open up a terminal (search for
Command Prompton Windows andTerminalon Mac OS) and type injava -version. This will show your java version, if you have it installed. - If you do not have Java 11 or above installed, please proceed to this link and download the appropriate Java for your operating system.
- To check if you have Java installed, please open up a terminal (search for
-
Download the latest NotionUS.jar from here.
-
Move the file to the folder you want to use as the home folder for NotionUS. Note that a new folder will be created in the same location as the file, which will contain the application data.
-
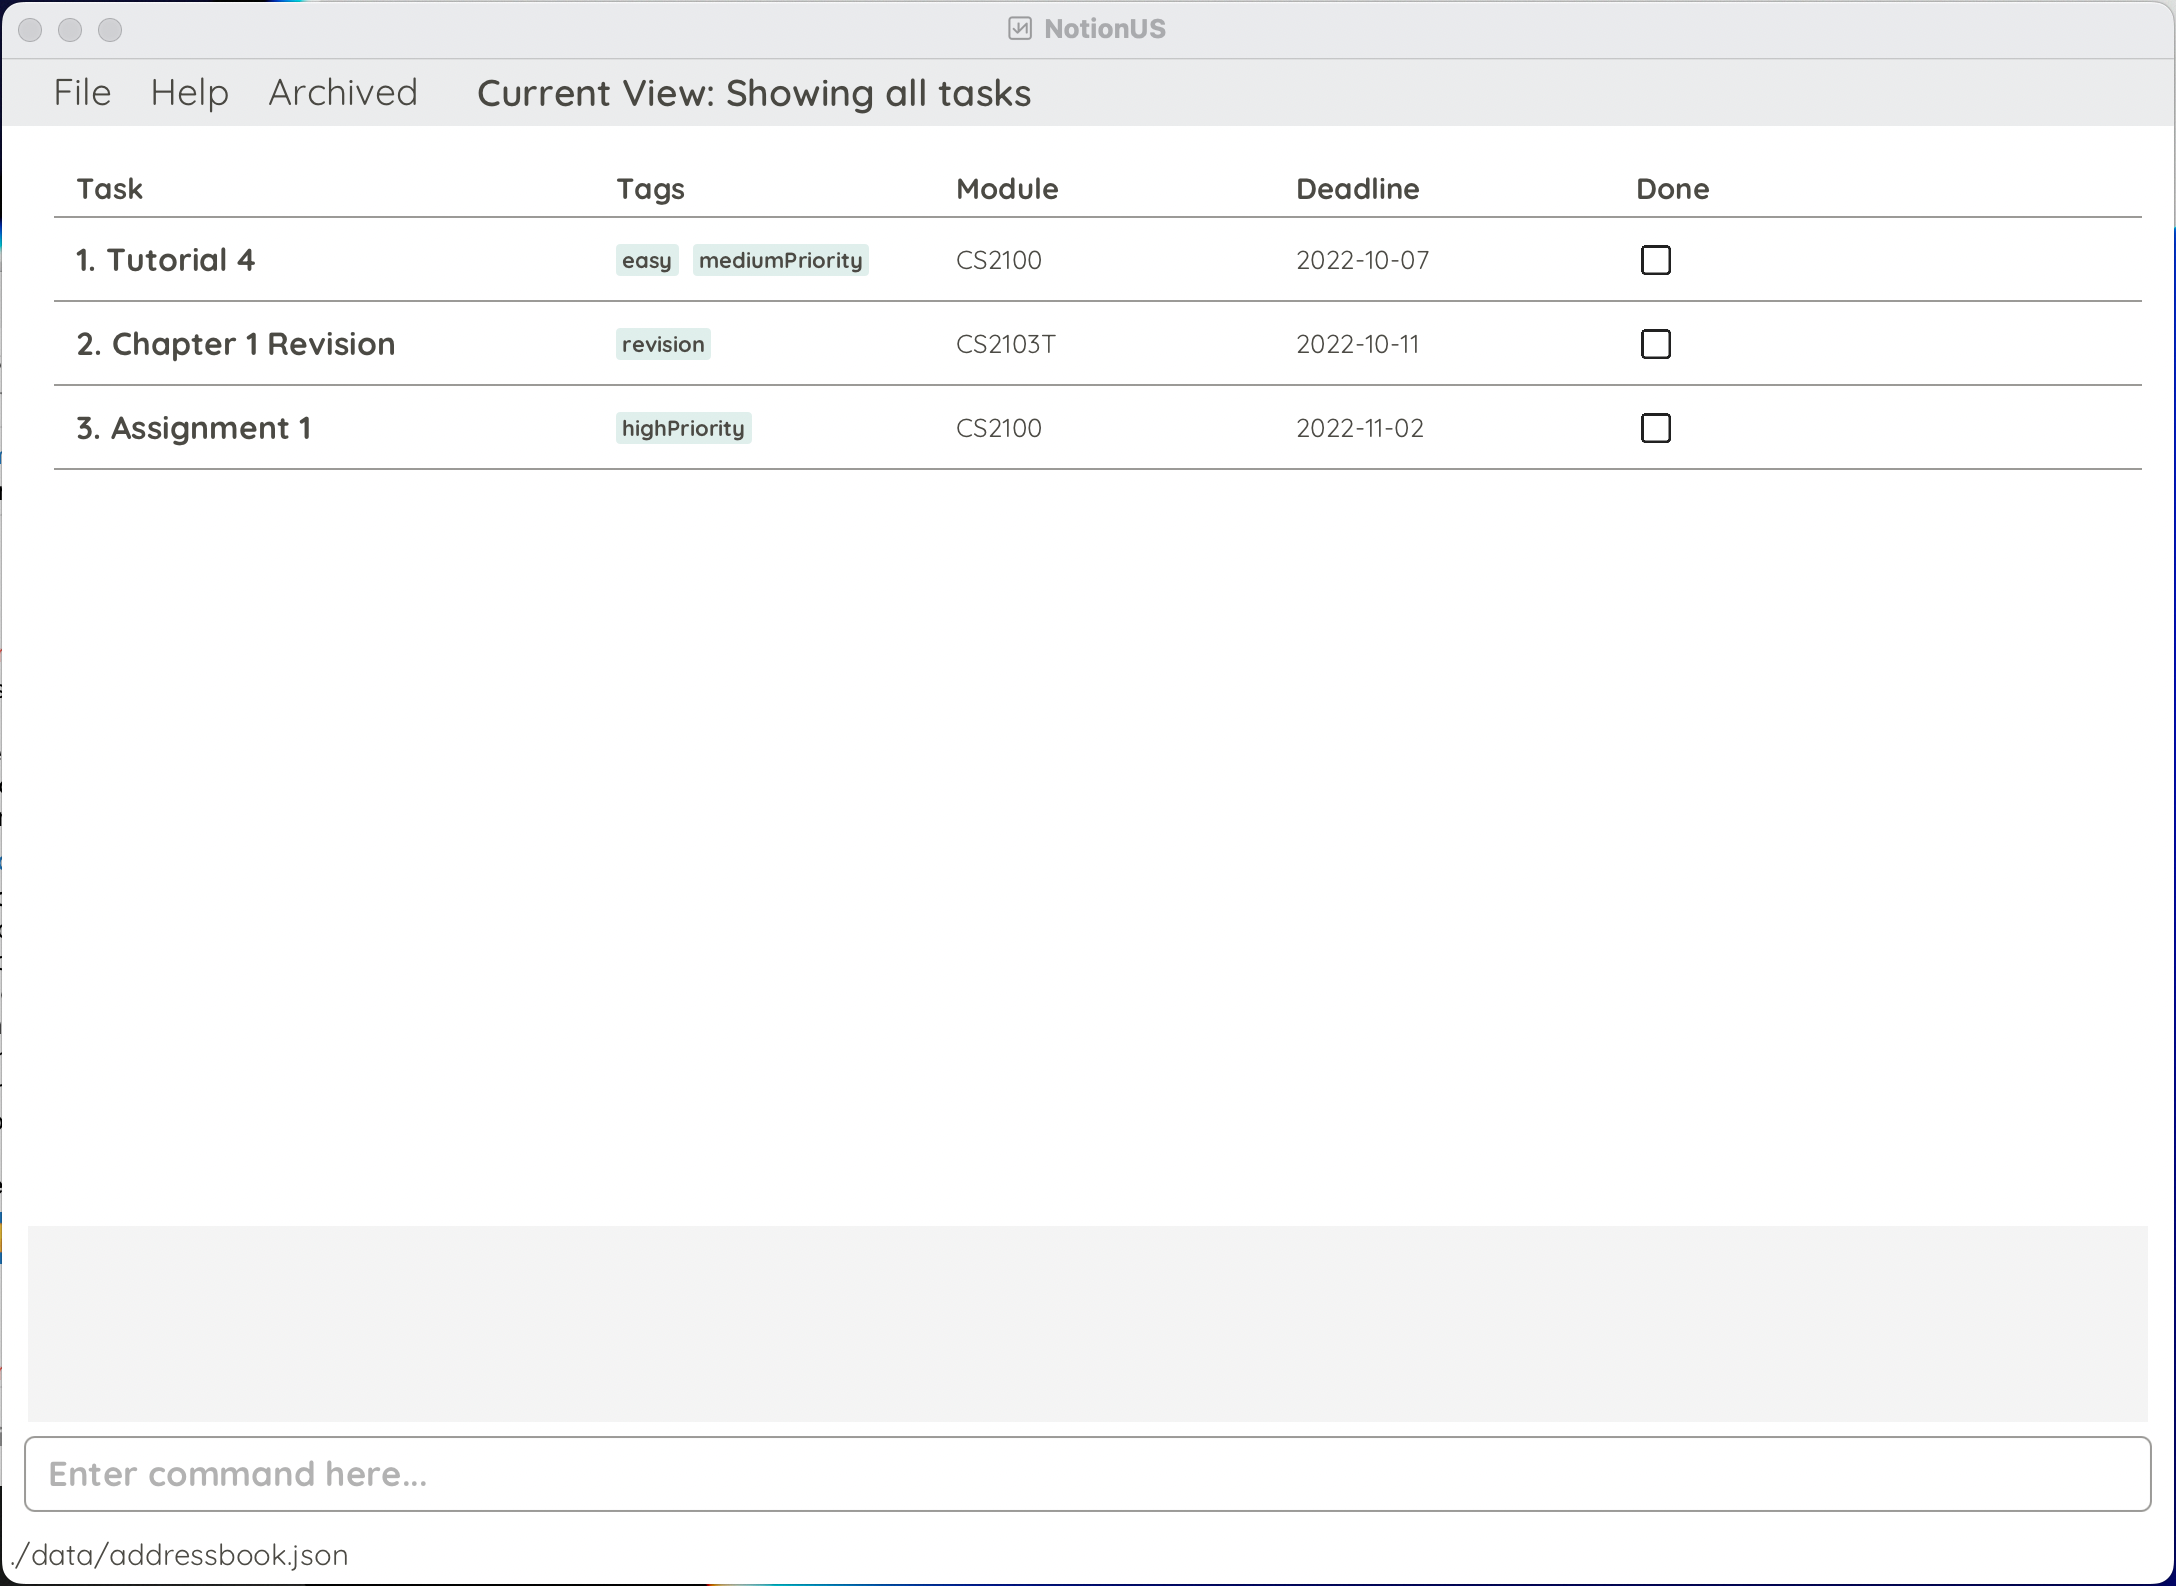
Double-click the file to start the app. The app should look like the image below, and have some sample data has been pre-loaded to experiment with.
Understanding the Graphical User Interface (GUI)
Understanding the GUI is essential to making the most out of your experience in the app.
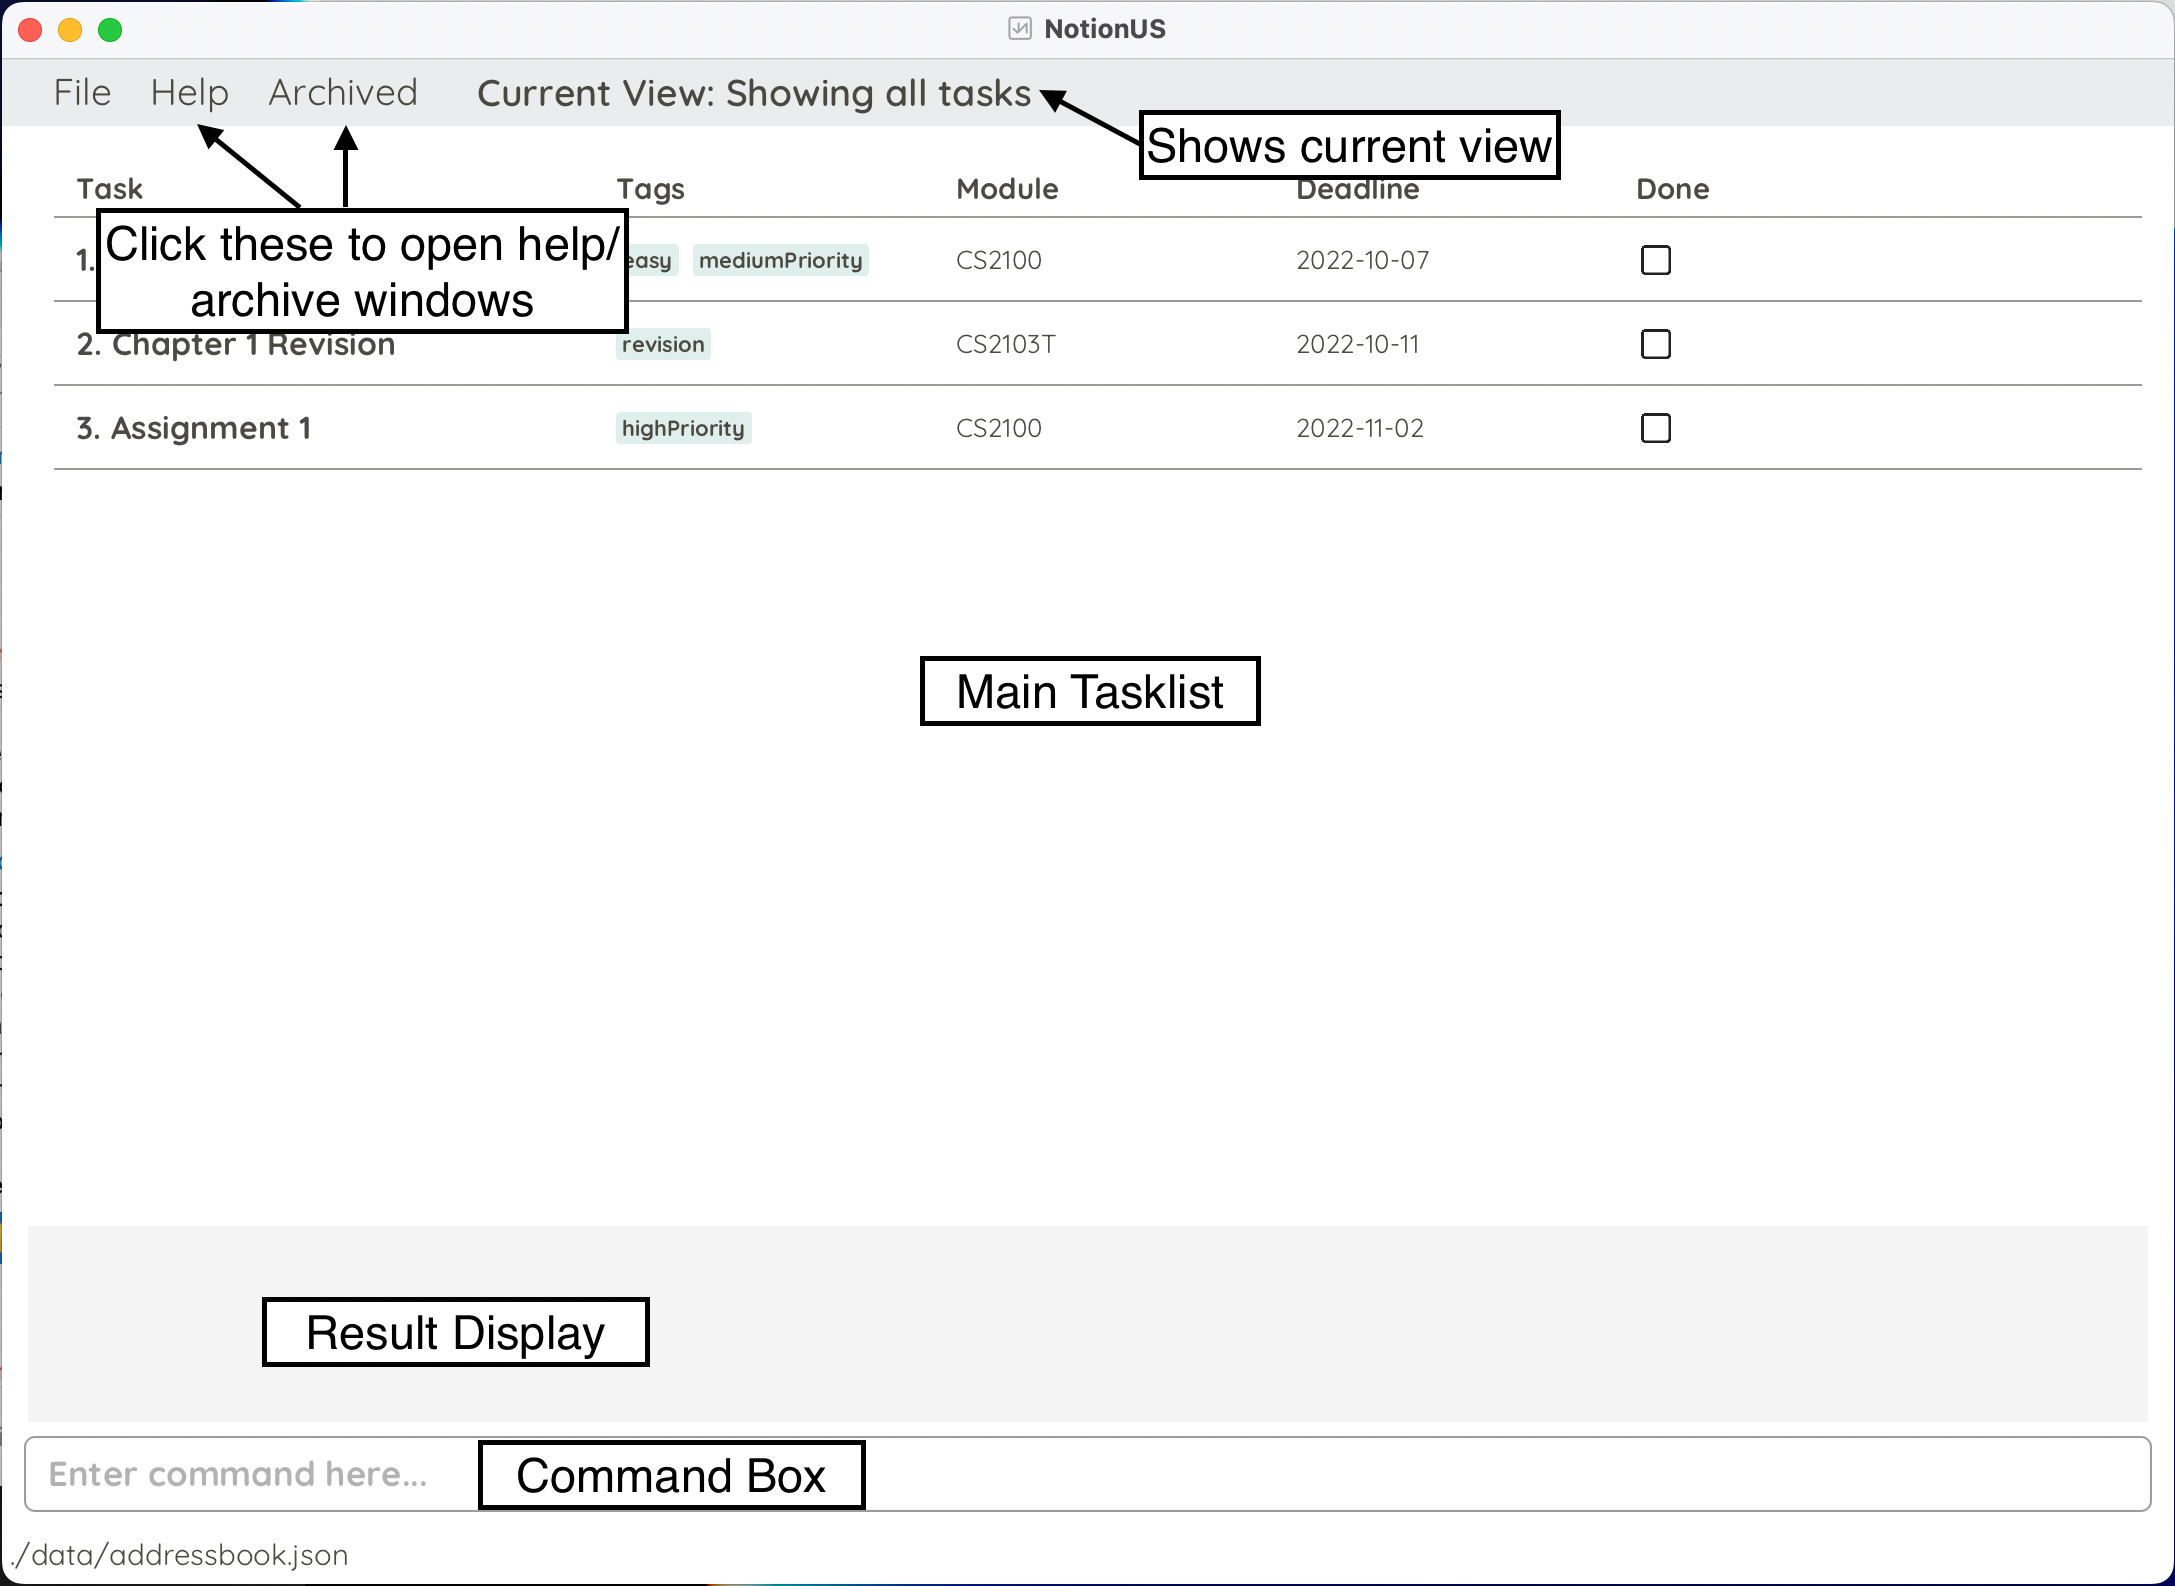
From top to bottom:
-
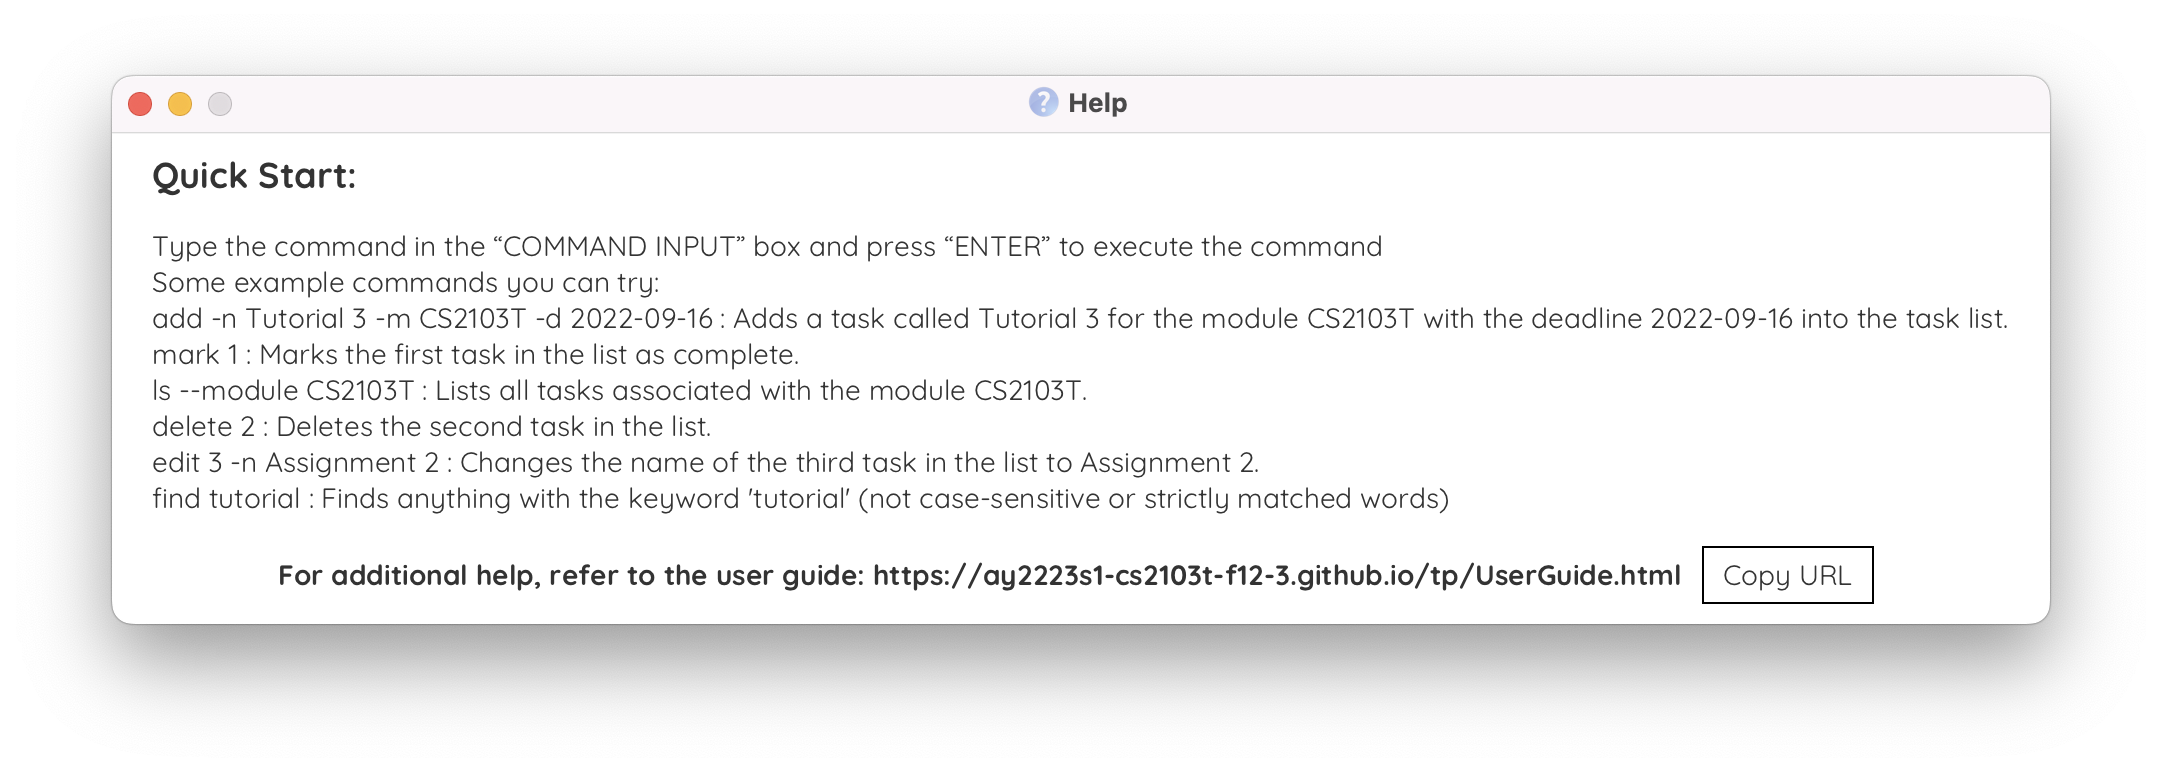
HelpandArchivedButtons:- Click
Helpto open the help menu which will display a list of example commands and a link to our user guide. - Click
Archivedto open the archived tasks window, which shows any previously archived tasks.
- Click
- Filter status display:
- This displays any filters applied on the list using commands such as
lsorfind, for more information please refer to the Features section below.
- This displays any filters applied on the list using commands such as
- Main task list:
- This displays all your current tasks.
- Result display:
- The result displays any information regarding command inputs, such as success or errors.
- Command box:
- This is where you enter commands to control the app.
To learn more about other GUI Features, click here.
Now that you understand the GUI, lets try inputting a command into the app!
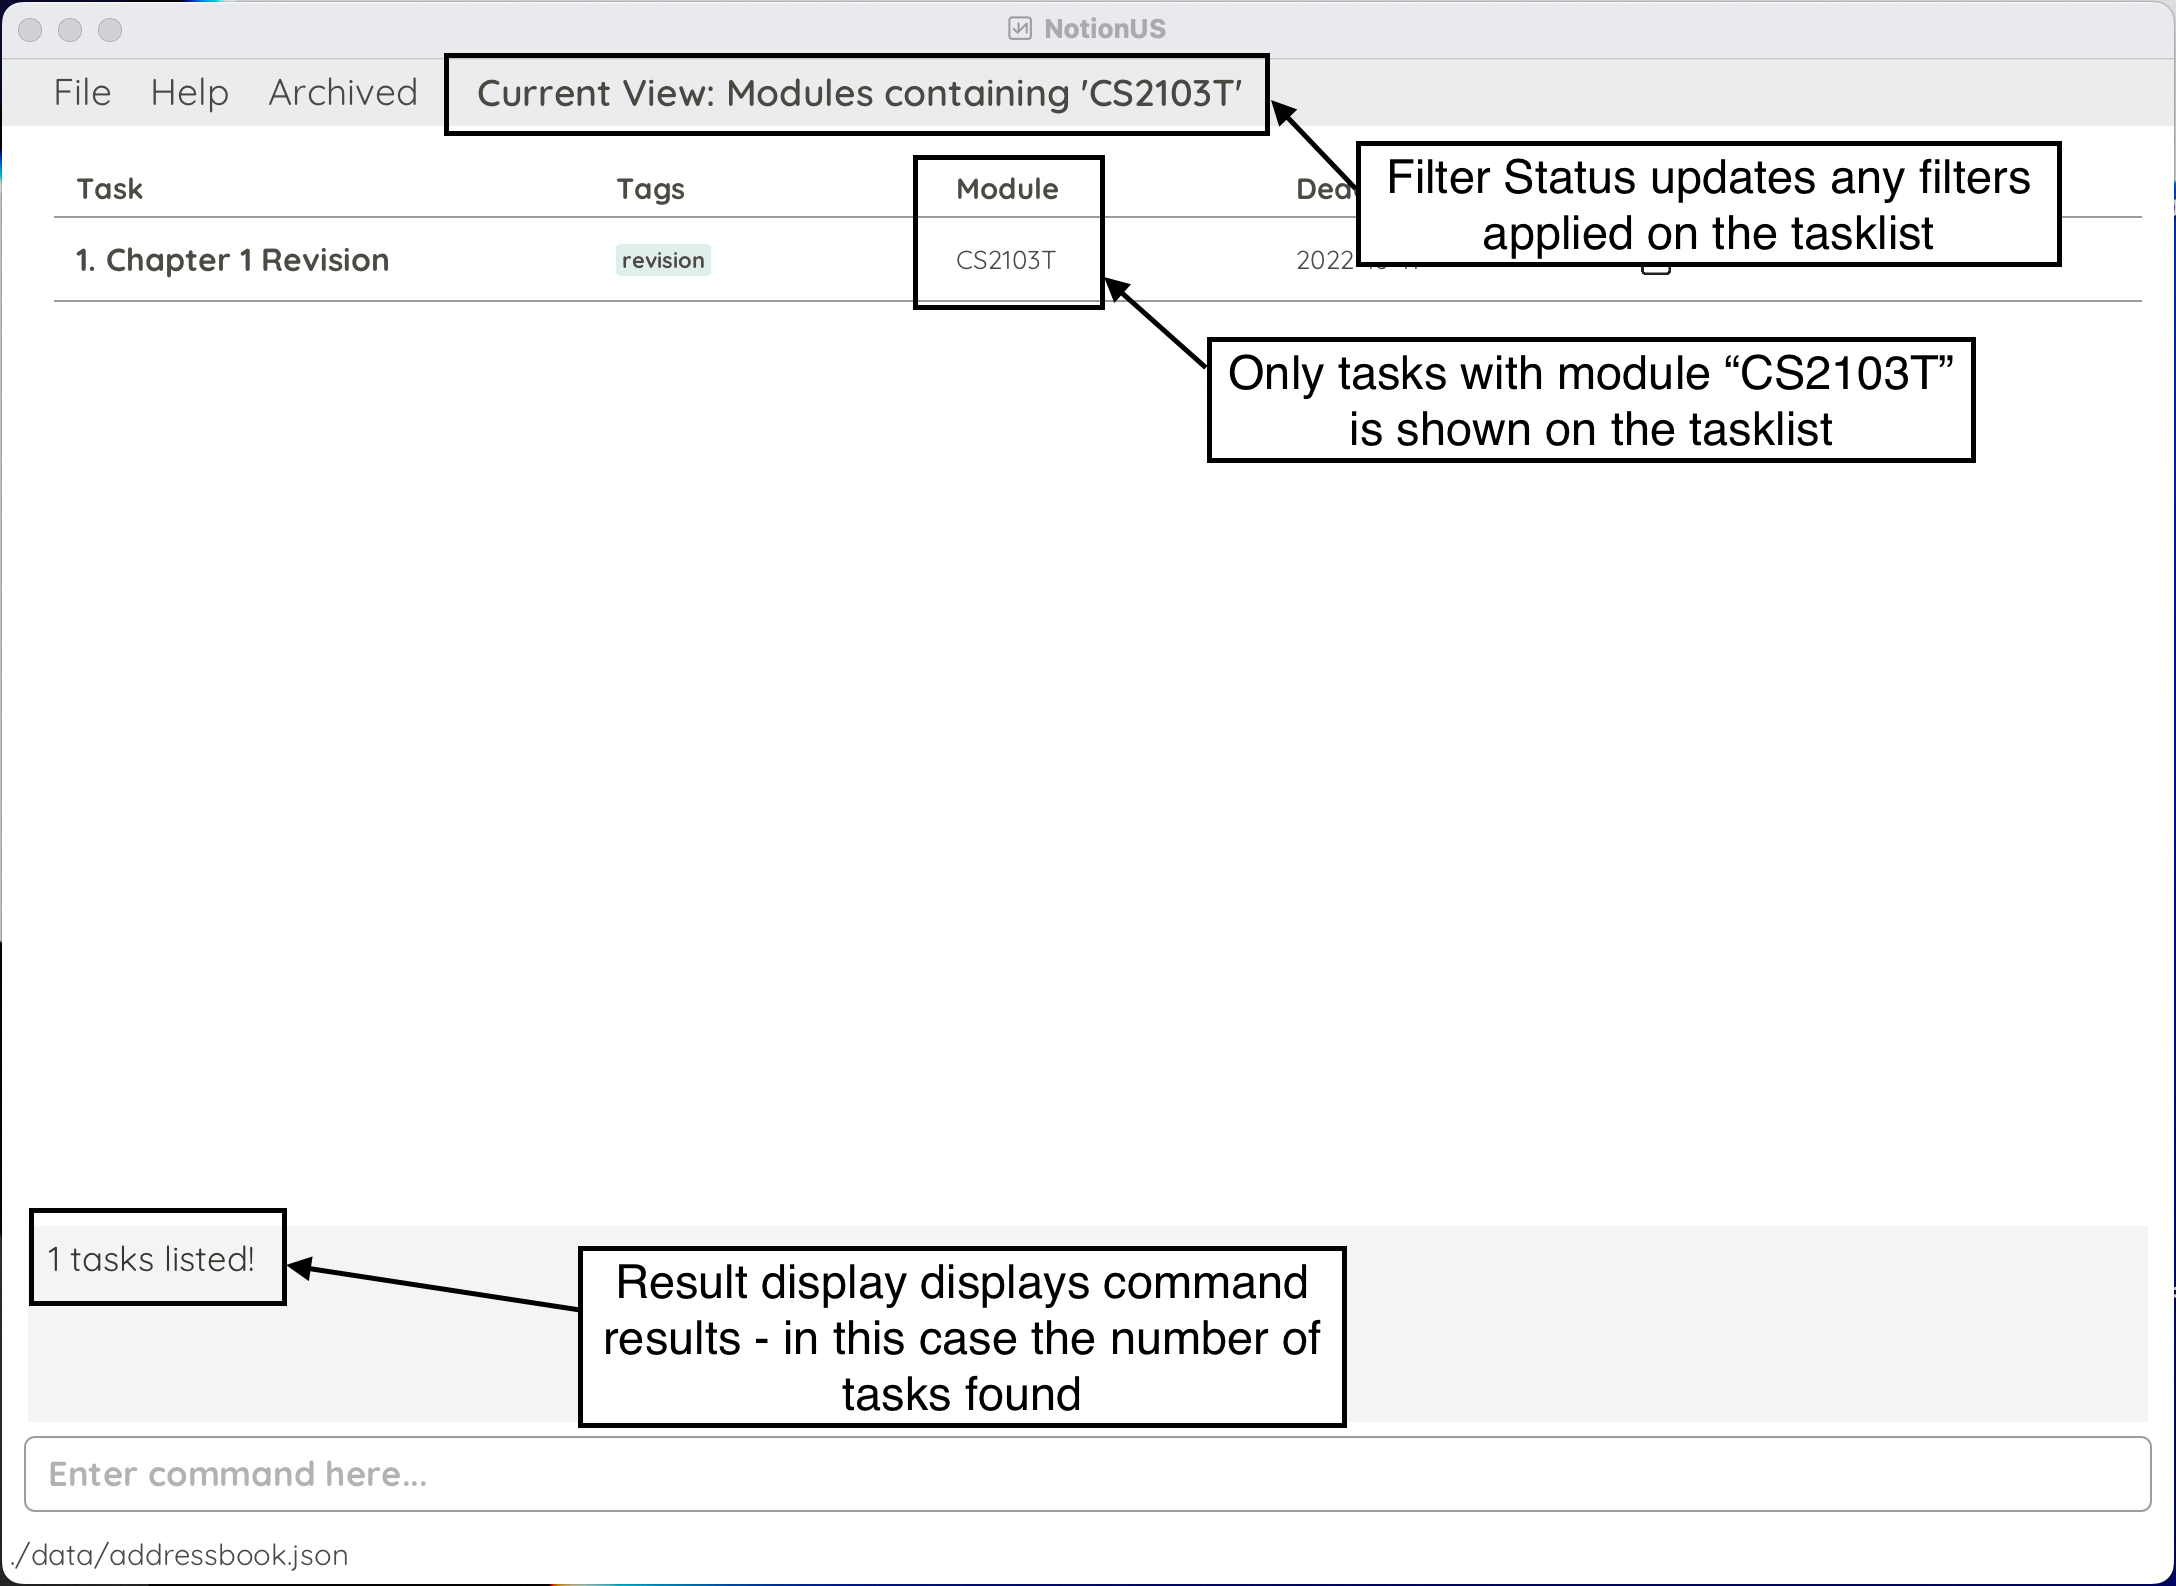
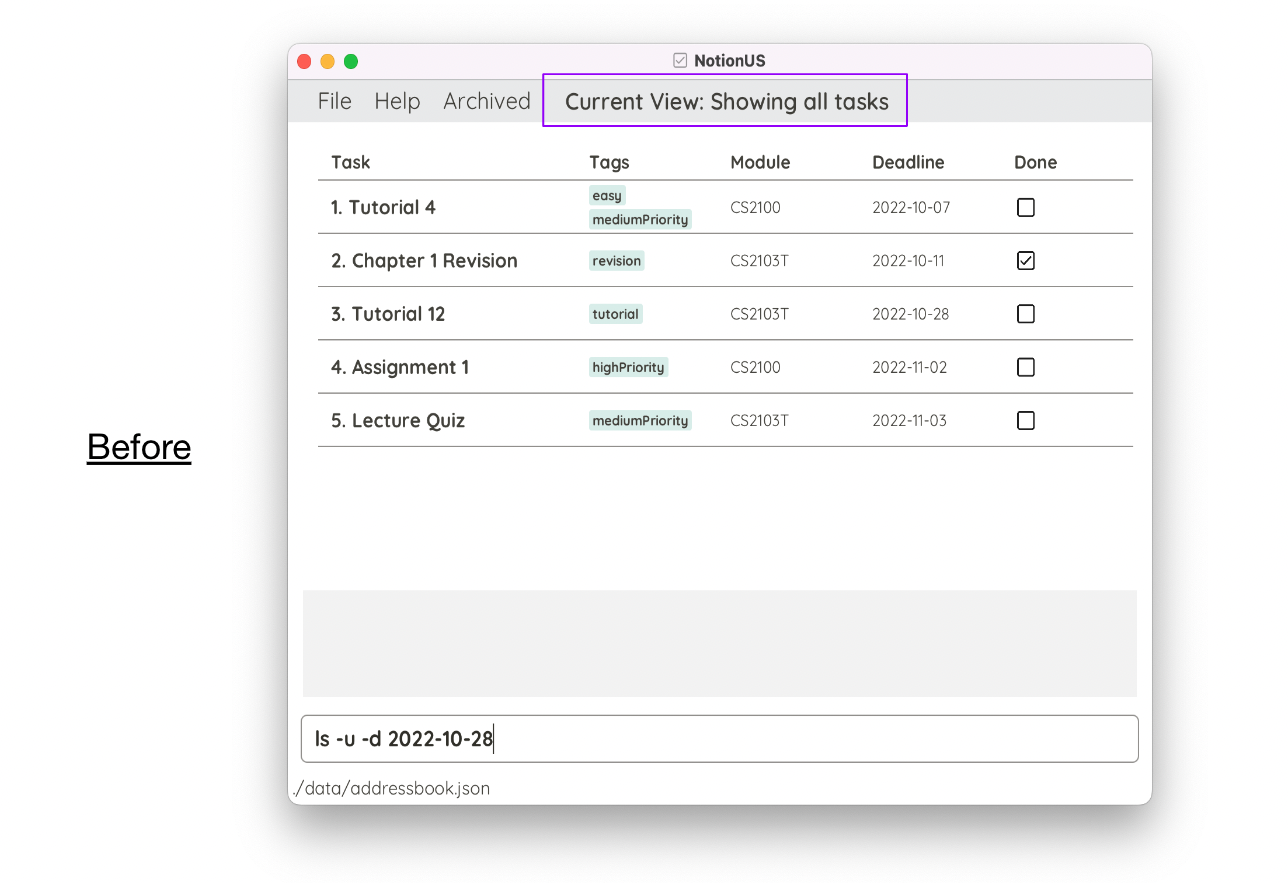
Try typing the command ls --module CS2103T in the “Enter command here…” box and press “ENTER” to execute the command.
CS2103T.
The GUI should be updated as shown below:
Some other example commands you can try:
-
add -n Tutorial 3 -m CS2103T -d 2022-10-10: Adds a task calledTutorial 3for the moduleCS2103Twith the deadline2022-09-16into the task list. -
mark 1: Marks the first task in the list as complete. -
delete 2: Deletes the second task in the list. -
edit 3 -n Assignment 2: Changes the name of the third task in the list toAssignment 2. -
find tutorial: Finds anything with the keyword ‘tutorial’ (not case-sensitive or strictly matched words)
You can also continue reading the command features section to read more about how to use each command!
Click to return to: Quick Start, Back to Top
GUI Features
Autocomplete
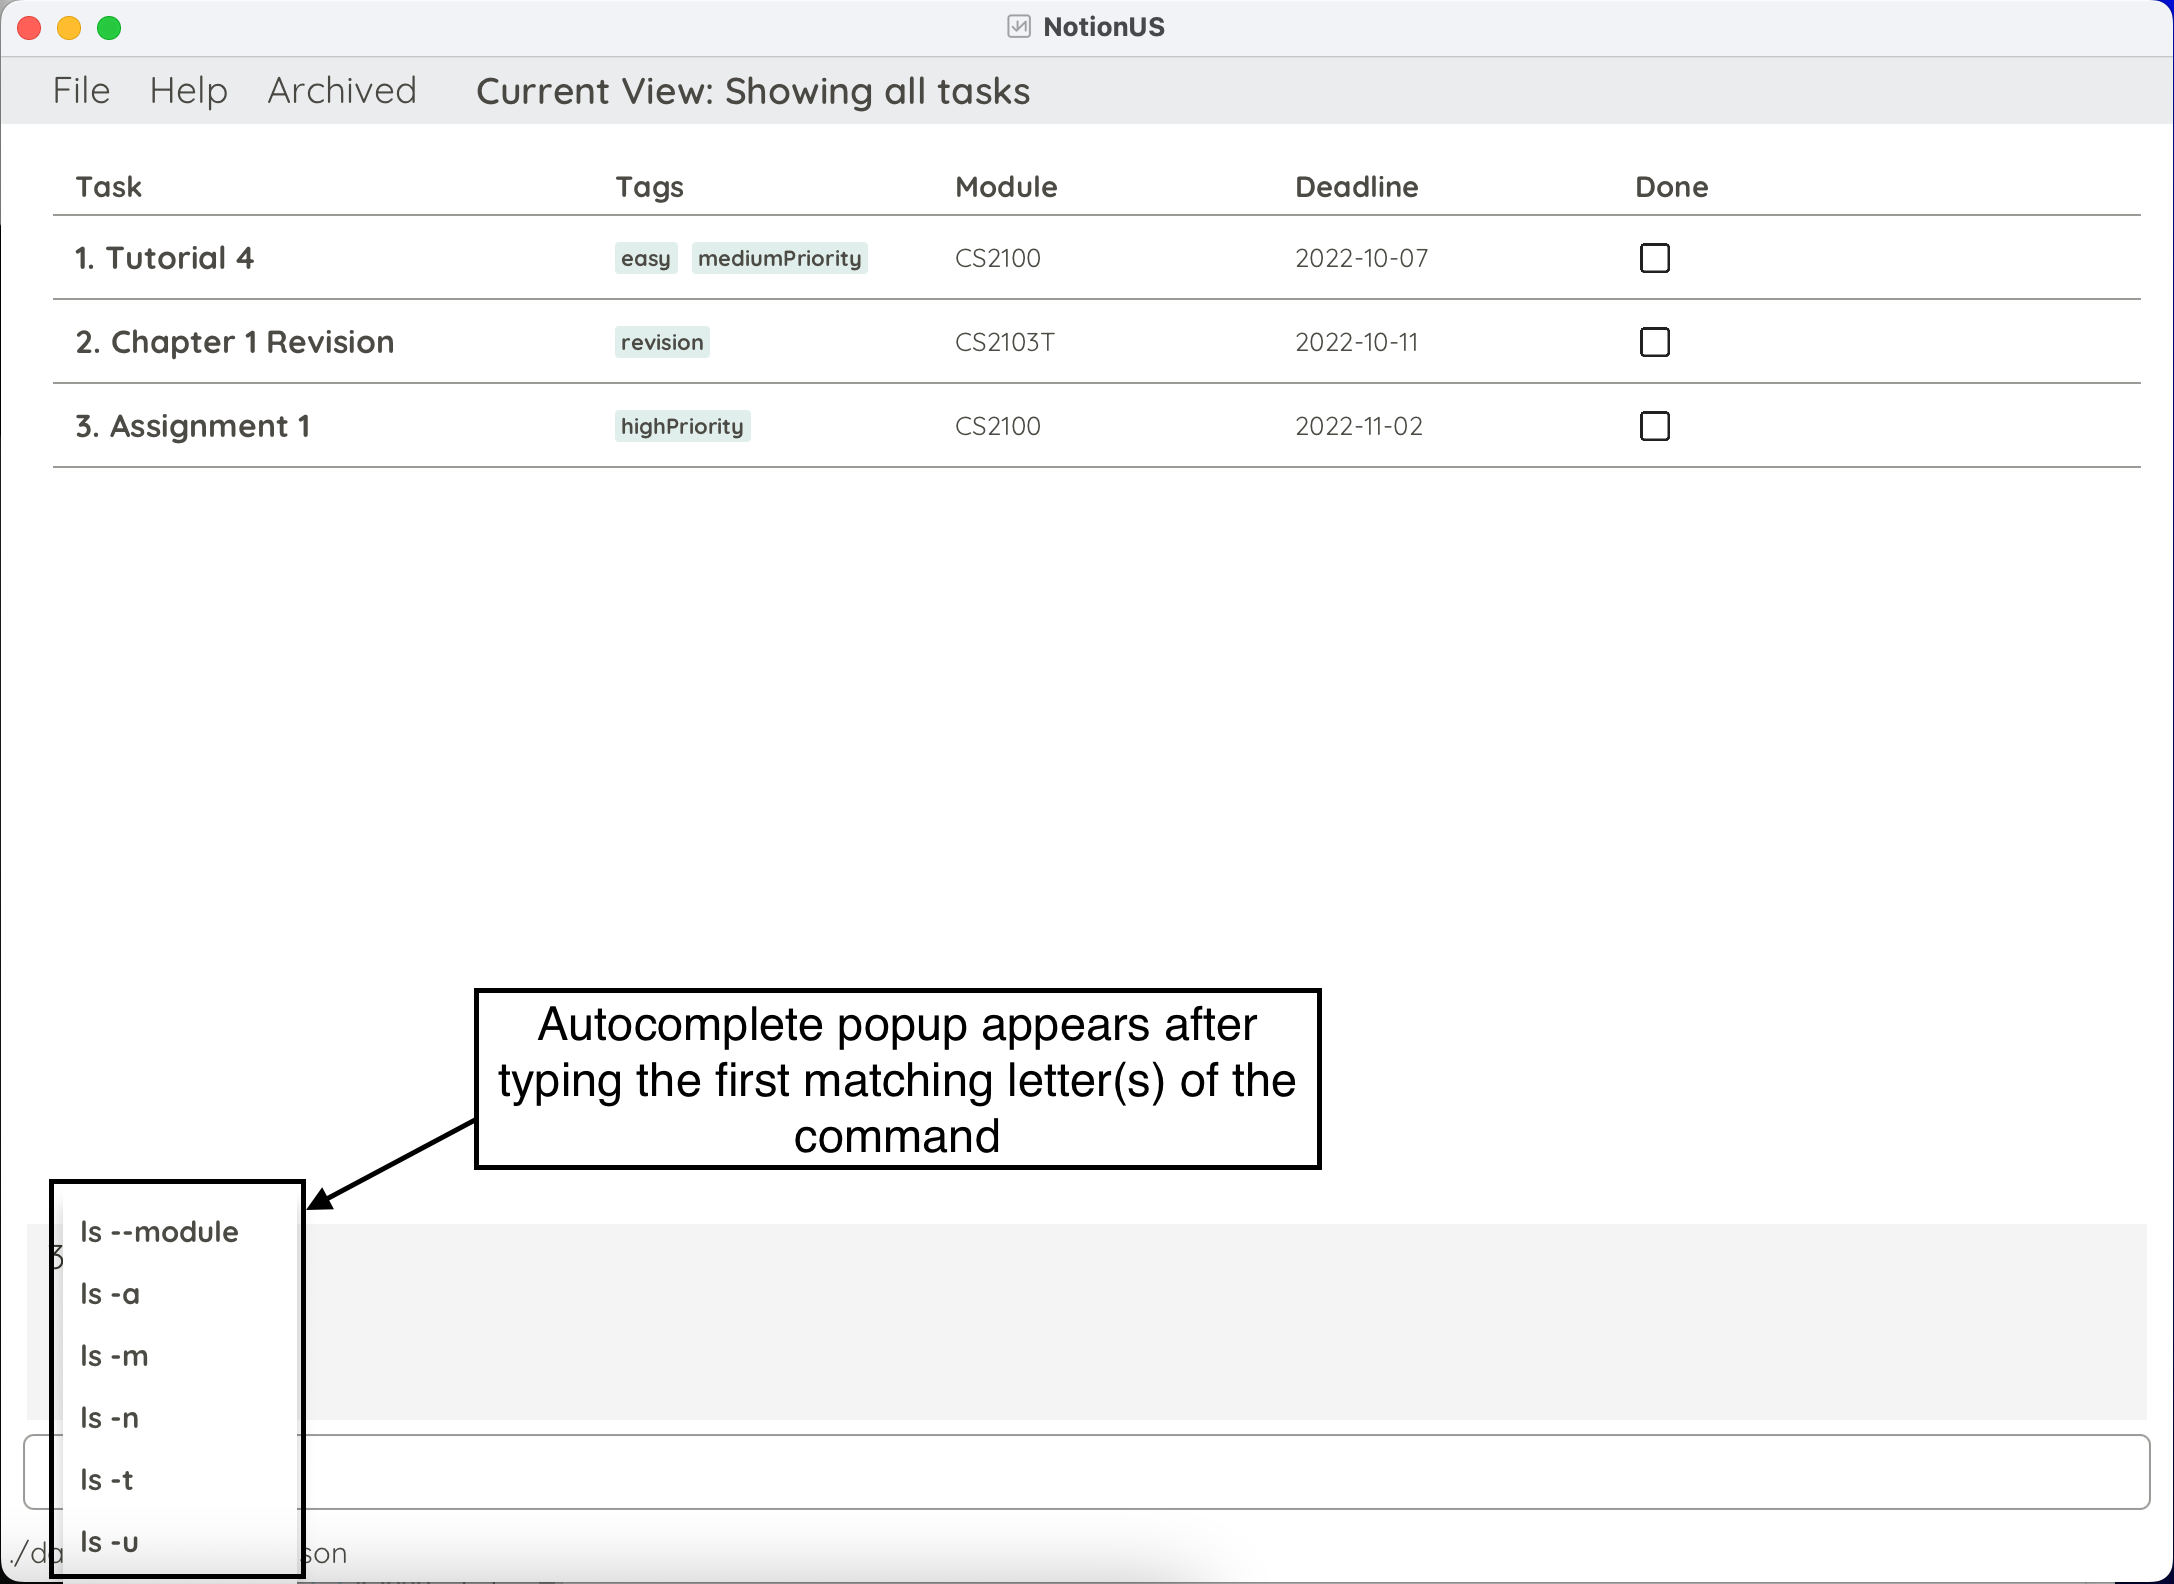
When the user starts to type in the start of a command in the Command Box, a pop-up menu will appear with options to complete your input.
Use the Up and Down arrow keys on your keyboard to navigate through the options and press the Enter key to fill the command box with the command
of your choice.
Here is an example of autocomplete in action:
However, it is recommended to read through the Features section to understand the syntax for commands that require additional input.
Returning to a previous command : Up/Down keys
Loads previous command into the Command Box.
While the Command Box is in focus, use the Up and Down arrow keys on your keyboard to navigate through the command history that is automatically loaded in.
Click to return to: GUI Features, Back to Top
Command Features
You can jump to the following sections:
- Command Structure
- Getting Help
- Task Management - For actions like adding, editing and deleting tasks
- Viewing Specific Tasks
- Archive Management
- Exiting The Program
Click to return to: Back to Top
Command Structure
In this section, we will be explaining our commands. Before proceeding, we will need to explain how our commands are structured!
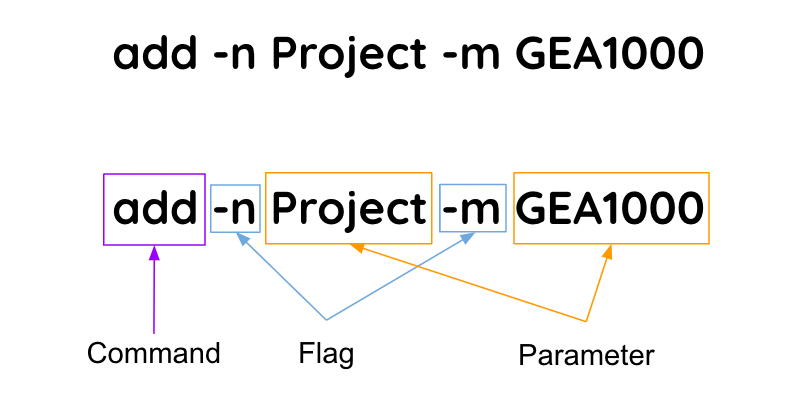
As seen in the image below, a command begins with a command word. If the command requires more information, it can be provided through flags and parameters. All flags begin with a hyphen, and any information for that flag is provided directly after, as a parameter.
As you are reading through this section, you will find that each command will have a “Format” section. This is the text that you need to enter into the command box in order to execute that command. To understand our format notation, read on!
![]() Notes about the command format:
Notes about the command format:
- Words in
lower_caseare commands or flags to be typed as-is - Words in
UPPER_CASEare values of parameters to be supplied by the user - Words in
[Square brackets]are optional parameters - Words that are followed by
*are parameters that can be used multiple times
Add command format: add -n TASK_NAME -m MODULE [-d DATE] [-t TAG_NAME]*
Using the add command format above as an example, the following are a few good and bad examples of what a command can be:
- Since square brackets are optional,
add -n Project -m GEA1000is valid - Since there is a
*, we can put multiple tags at one, e.g.add -n Project -m GEA1000 -t Optional -t Group - Modules are not surrounded by square brackets, and so they are compulsory. Hence,
add -n Projectis invalid -
add,-nand-mare in lower case, and so must be kept that way. Thus,ADD -N Project -M GEA1000is invalid
And a few more notes about command structure,
- Command flags (e.g.
-a,-m) can be made in any order - If a parameter is expected only once in a command but was specified multiple times, the last occurrence of it will be taken
- Irrelevant flags and parameters provided to commands will simply be ignored
For example, add -m GEA1000 -m CS2100 -p -n Project will be interpreted as add -n Project -m CS2100, since
- Flag order does not matter
- Last occurrence of the duplicate flag
-mis taken - The
-pflag is not expected by the add command and is thus ignored
![]() Additional information about task constraints:
Additional information about task constraints:
- Task names can only contain letters, numbers and spaces. For example,
Assignment-5is not a valid name as it contains a hyphen. - Dates must be written in the format YYYY-MM-DD, eg
2022-10-30. - Module names and tags can only contain letters and numbers, no spaces allowed.
Getting help : help
Displays list of commands and information about NotionUS.
Format: help
Click to return to: Command Features, Back to Top
Task Management
We have the following commands in this section:
- Adding a task
- Editing a task
- Deleting a task
- Marking a task as complete
- Unmarking a task
- Tagging a task
- Clearing all entries
Click to return to: Command Features, Back to Top
Adding a task: add
Adds a task to the task list.
Format: add -n TASK_NAME -m MODULE [-d DATE] [-t TAG_NAME]*
Reminder: Params in [] are optional, and -t TAG_NAME can be used multiple times.
![]() Notes about usage of the add command:
Notes about usage of the add command:
- Duplicate detection - If you try to add in a task with the same name and module as an existing task, we will inform you that such a task already exists within the task list and reject your command
-
Optional deadlines - Tasks with no deadlines are treated as being due “far in the future”, meaning they
will be placed at the end of the task list. You can have a task with no deadline by either not providing the
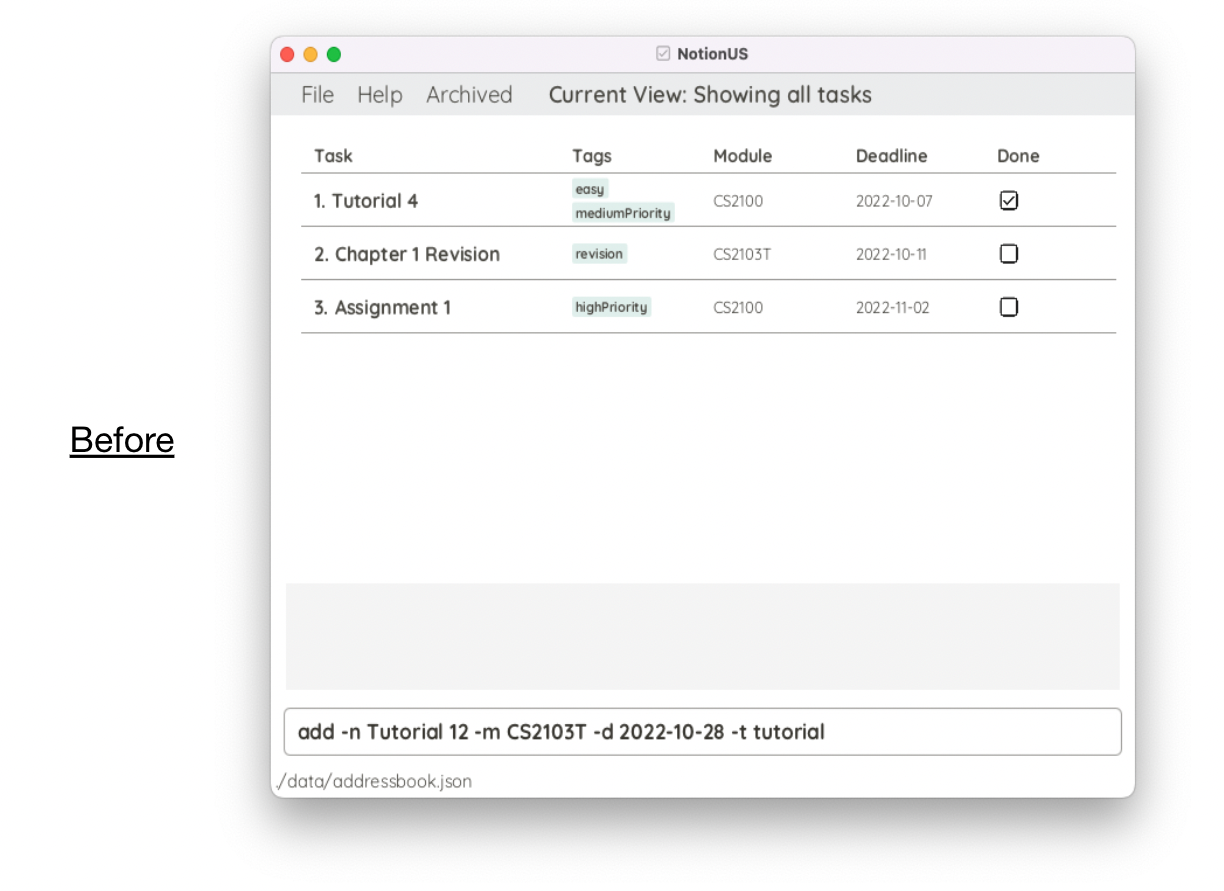
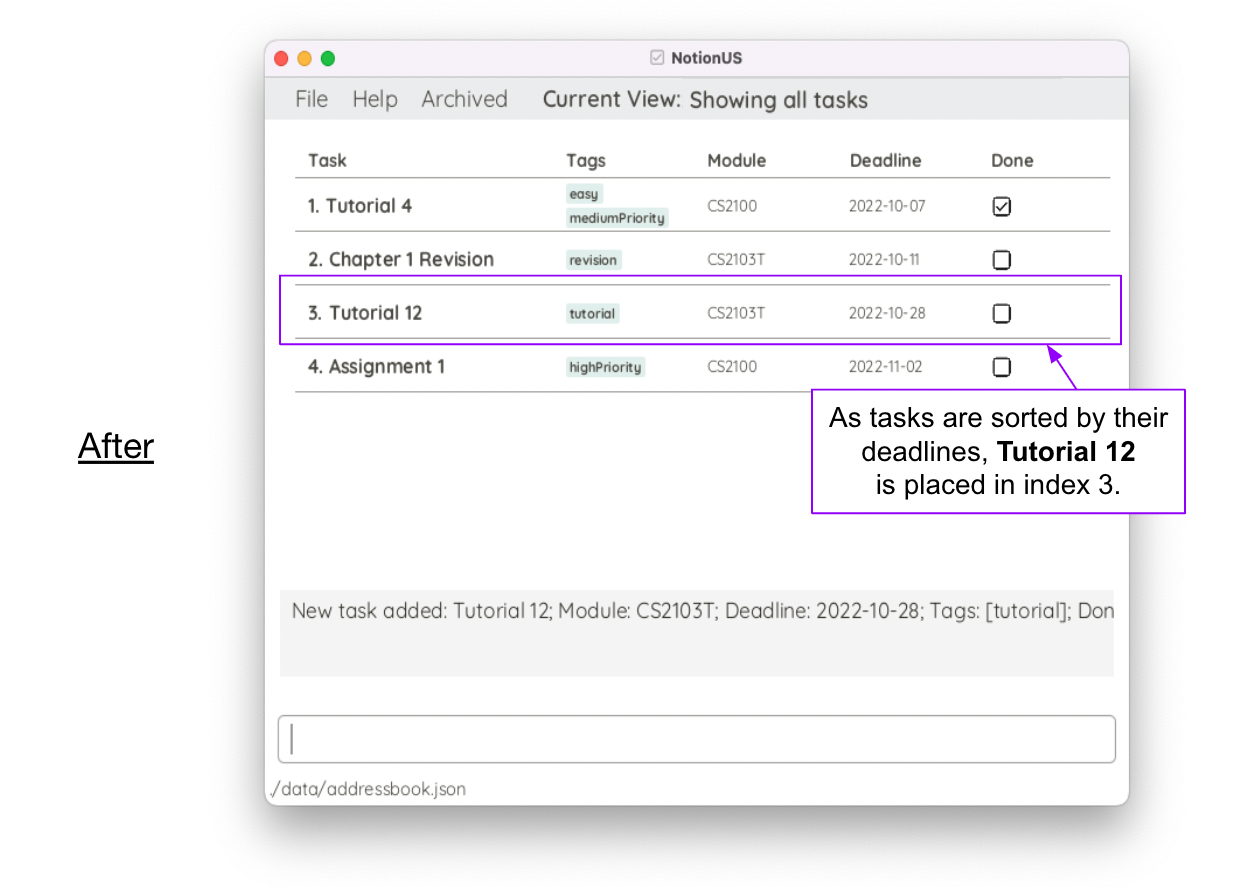
-dflag, or providing the-dflag with no parameter. - Ordering of tasks - Tasks are first ordered by their deadlines, followed by the module name and then the task name, in alphabetical order.
Examples:
add -n Task 1 -m CS2103T -d 2022-10-15 -t homeworkadd -n Tutorial 3 -m CS2103Tadd -n Tutorial 12 -m CS2103T -d 2022-10-28 -t tutorial
Editing a task : edit
Edits an existing task in the task list, at least one field needs to be edited.
Format: edit TASK_NUMBER [-n TASK_NAME] [-m MODULE] [-d DATE] [-t TAG_NAME]*
Reminder: Parameters in [] are optional, and -t TAG_NAME can be used multiple times.
![]() Notes about usage of the edit command:
Notes about usage of the edit command:
- Duplicate detection - If you try to edit the task such that it will have the same name and module as another task, we will inform you that such a task already exists within the task list and reject your command
-
Deadline removal - Run the edit command with
-dwithout specifying a date, egedit 1 -d. -
Tags deletion - Similar to above, run the edit command with
-twithout specifying a tag, egedit 3 -t
Examples:
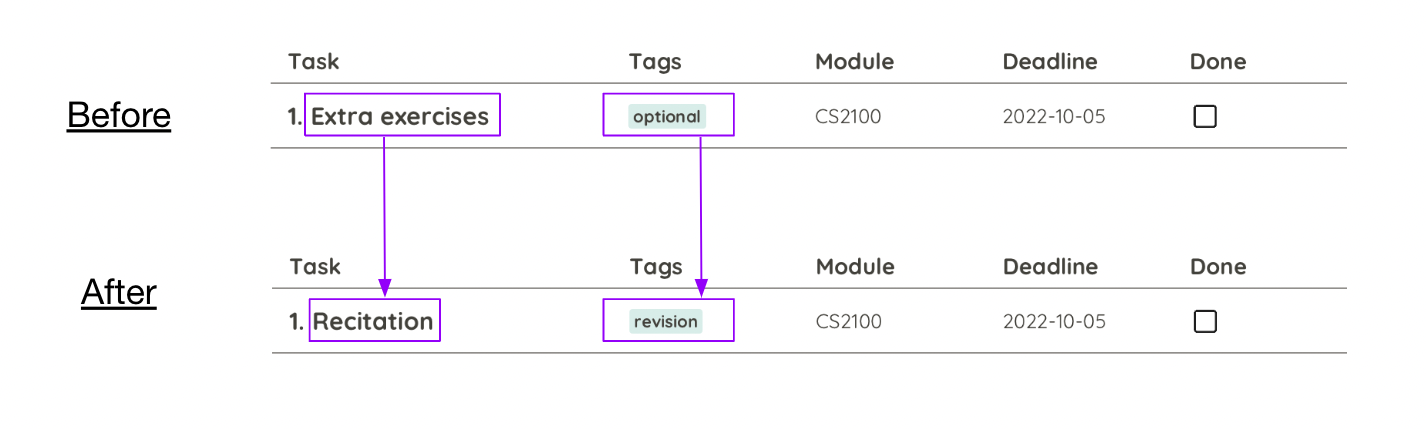
-
edit 1 -t revision -n RecitationEdits the tag to “revision” and taskName to “Recitation”.
Deleting a task : delete
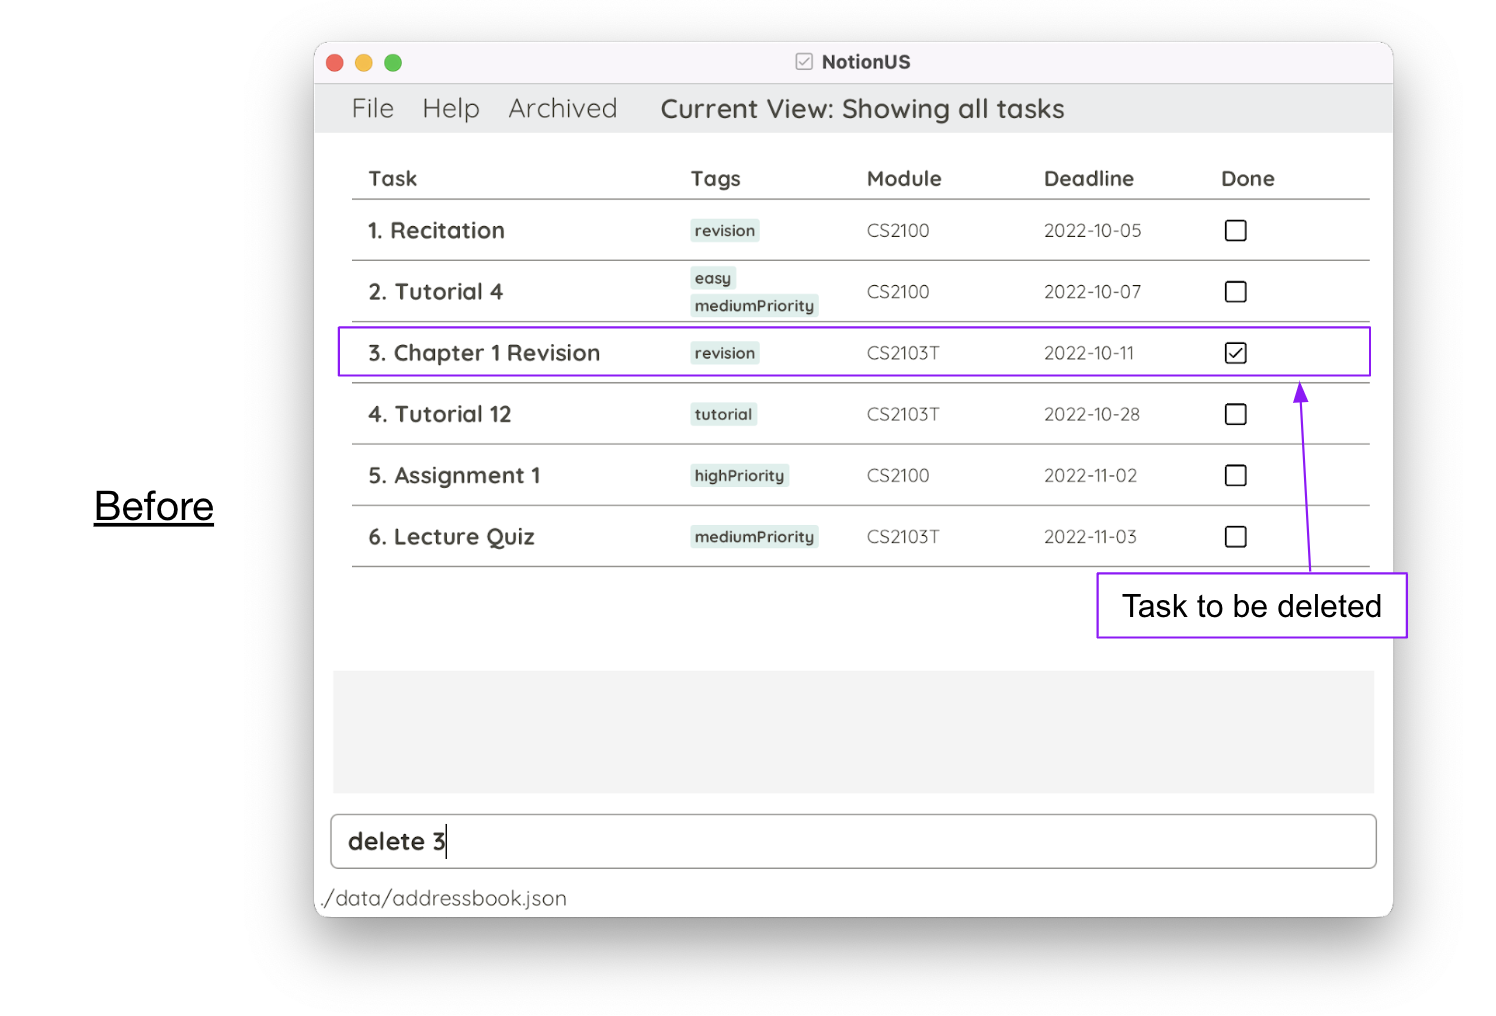
Allows user to delete a task from task list.
Format: delete TASK_NUMBER
Examples:
-
delete 3- Deletes third task in the task list.
- Remaining tasks’
TASK_NUMBERwill be automatically updated.

Marking a task as complete: mark
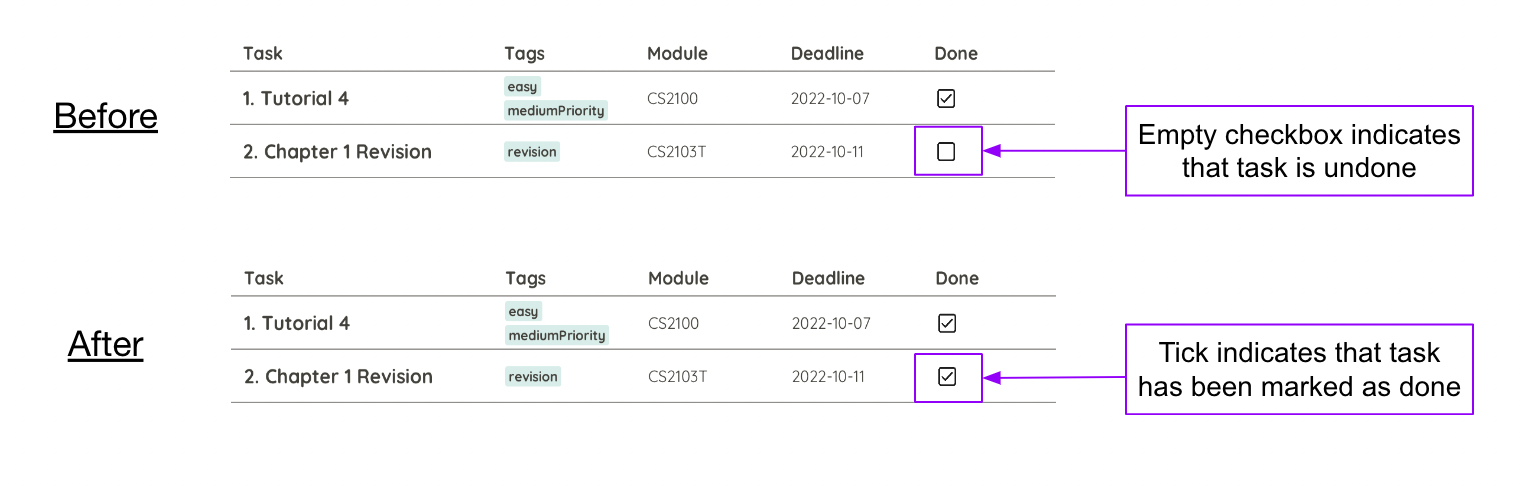
Mark a task as complete.
Note: Using mark on a task already marked as complete will not change its completion status.
Format: mark TASK_NUMBER
Example: mark 2
Unmarking a task: unmark
Unmark a task, i.e. mark a task as incomplete.
Note: Using unmark on a task that is not complete will not change its completion status.
Format: unmark TASK_NUMBER
Example: unmark 2
Tagging a task: tag
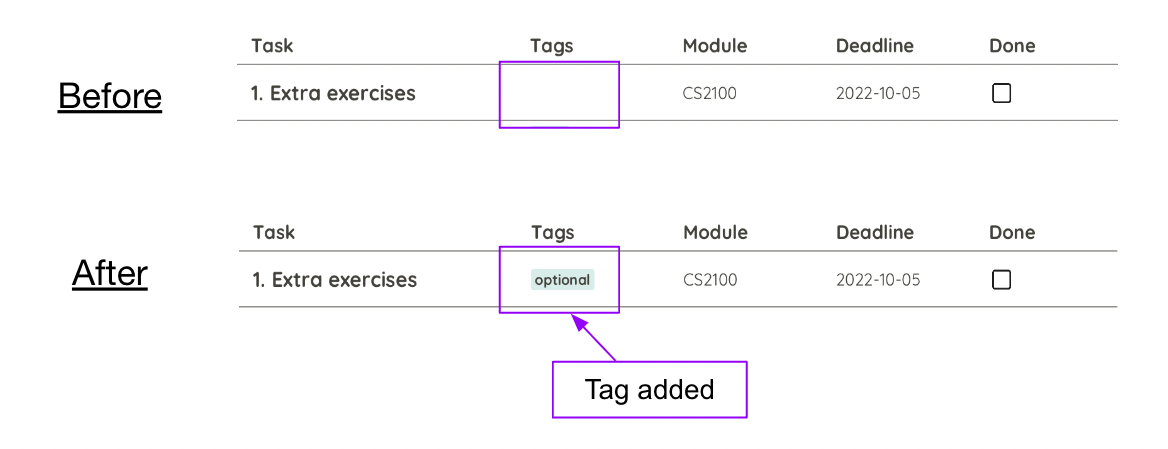
Allows you to tag a task.
Format : tag TASK_NUMBER -t TAG_NAME [-t TAG_NAME]*
-
TASK_NUMBER: This is the number of the task currently displayed. -
TAG_NAME: The word to tag the task with, should be alphanumeric, i.e. must not contain any spaces. -
[-t TAG_NAME]*: You may add more than one tag by adding-t TAG_NAMEafter your first tag.
Example: tag 1 -t optional
Clearing all entries : clear
Clears all entries of tasks in the task list.
![]() Note:
Note:
Clear command does not clear archived task list.
Format: clear
Viewing Specific Tasks
ls commands filter the task list. There are multiple ways to filter the task list, such as
listing all tasks, unmarked tasks, all tasks under a module name, etc. You may apply multiple list flags in one
command to filter a list down to the results you are looking for. To reset the list, use the command ls -a.
Current filters applied will be shown in the UI at the top bar.
We have the following commands in this section:
- Listing all tasks
- Listing all unmarked tasks
- Listing all marked tasks
- Listing all tasks under the same module
- Listing all tasks containing the same tag
- Listing all tasks with deadline on or after a date
- Listing all task names with the matching keywords
Click to return to: Command Features, Back to Top
Listing all tasks : ls -a
Shows a list of all tasks in the task list.
Format: ls -a
Listing all unmarked tasks : ls -u
Shows a list of all unmarked tasks in the task list, i.e. shows a list of uncompleted tasks.
Format: ls -u
Listing all marked tasks : ls -m
Shows a list of all marked tasks in the task list, i.e. shows a list of completed tasks.
Format: ls -m
Listing all tasks under the same module : ls --module
Shows a list of all tasks under the same module.
Format: ls --module MODULE
-
MODULE: Should be alphanumeric, i.e. must not contain any spaces.
Example: ls --module cs2103t
Listing all tasks containing the same tag : ls -t
Shows a list of tasks whose tags match exactly with the tag_name. (Case-insensitive)
Format: ls -t TAG_NAME
-
TAG_NAME: The tag you are looking for should be an exact match and alphanumeric, ie must not contain any spaces.
Example: ls -t highPriority will find tags with highpriority (Case-insensitive)
![]() Tip:
Tip:
Any command that searches for tags finds all tags that exactly match, but is case-insensitive.
Listing all tasks with deadline on or after a date : ls -d
Shows a list of all tasks with deadline on or after the inputted date.
As tasks with no deadline can be considered to be due “far in the future”, this command will always list tasks with no deadlines.
Format: ls -d DATE
-
DATE: Must be in the format of YYYY-MM-DD.
Example: ls -d 2022-11-11
Listing all task names with the matching keywords: ls -n
Shows a list of all tasks with matching names.
Format: ls -n KEYWORD*
-
KEYWORD: One or more keywords can be provided. Each keyword should consist of only letters and numbers, and are separated by spaces.
Example: ls -n task1
![]() Tip:
Tip:
Any command that searches for names finds all task names that contain the keyword and does not have to be an exact match. It is also case-insensitive.
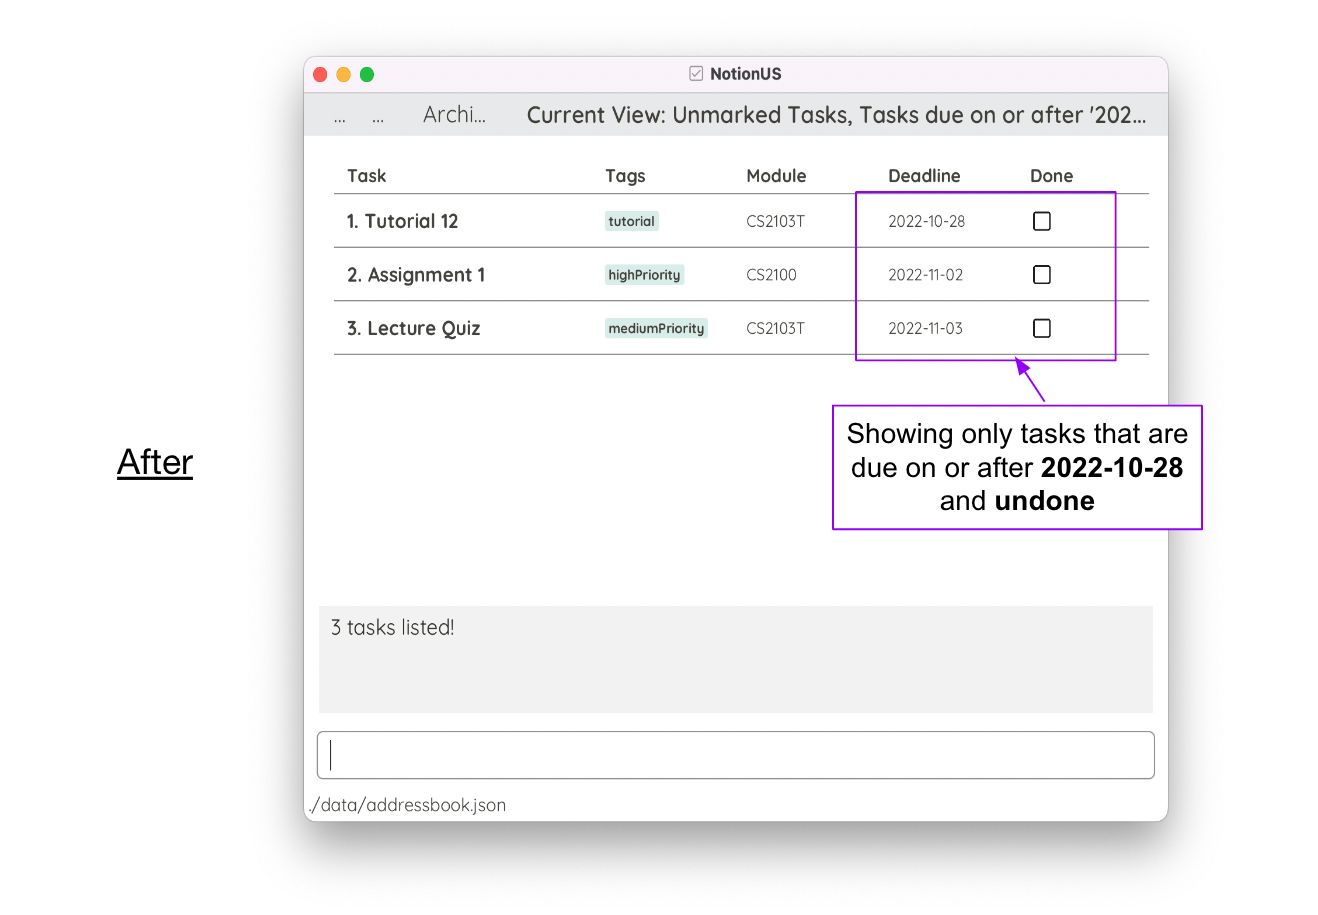
Find task names or tags: find
The find command finds the task names that contain the keywords and tags which exactly match with the
keywords. Meaning that names does not have to be an exact match (Example: searching tap with return a task with a
task name tape). find is not case-sensitive.
Format: find KEYWORD/TAG_NAME*
-
KEYWORD/TAG_NAME: One keyword/tag name or multiple, which should be alphanumeric and separated by spaces.
Singular word search example: find tut
finds names which contain tut and any tag that exactly match tut.
Example singular word search: 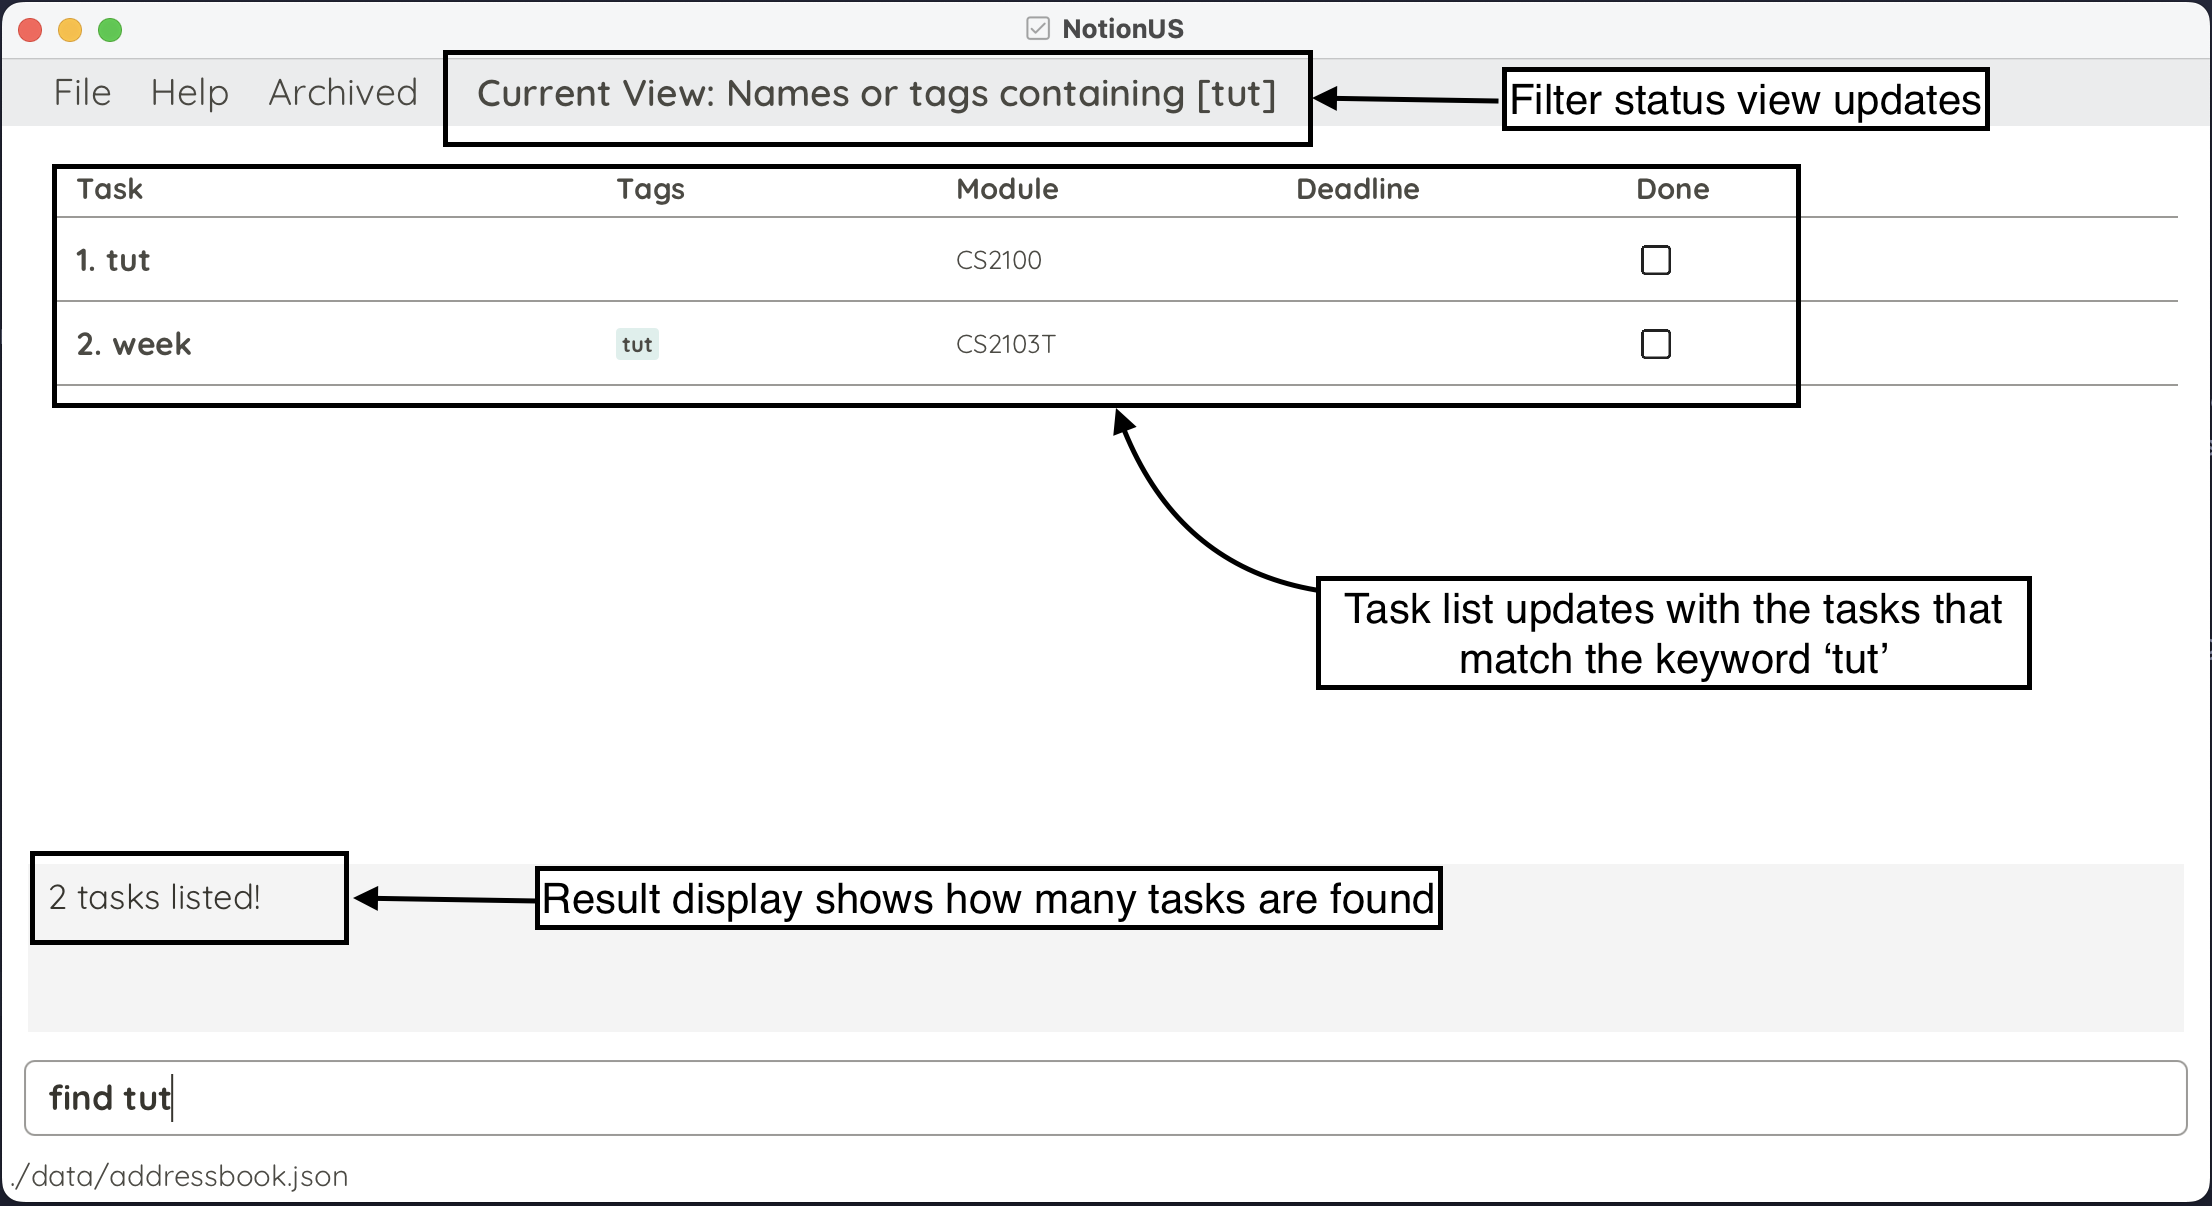
Multiple word search example: find Week tut
finds any task name that contain keywords week or tut or any tag that match them.
(Note that it is not limited to only 2 keywords)
Example multiple word search: 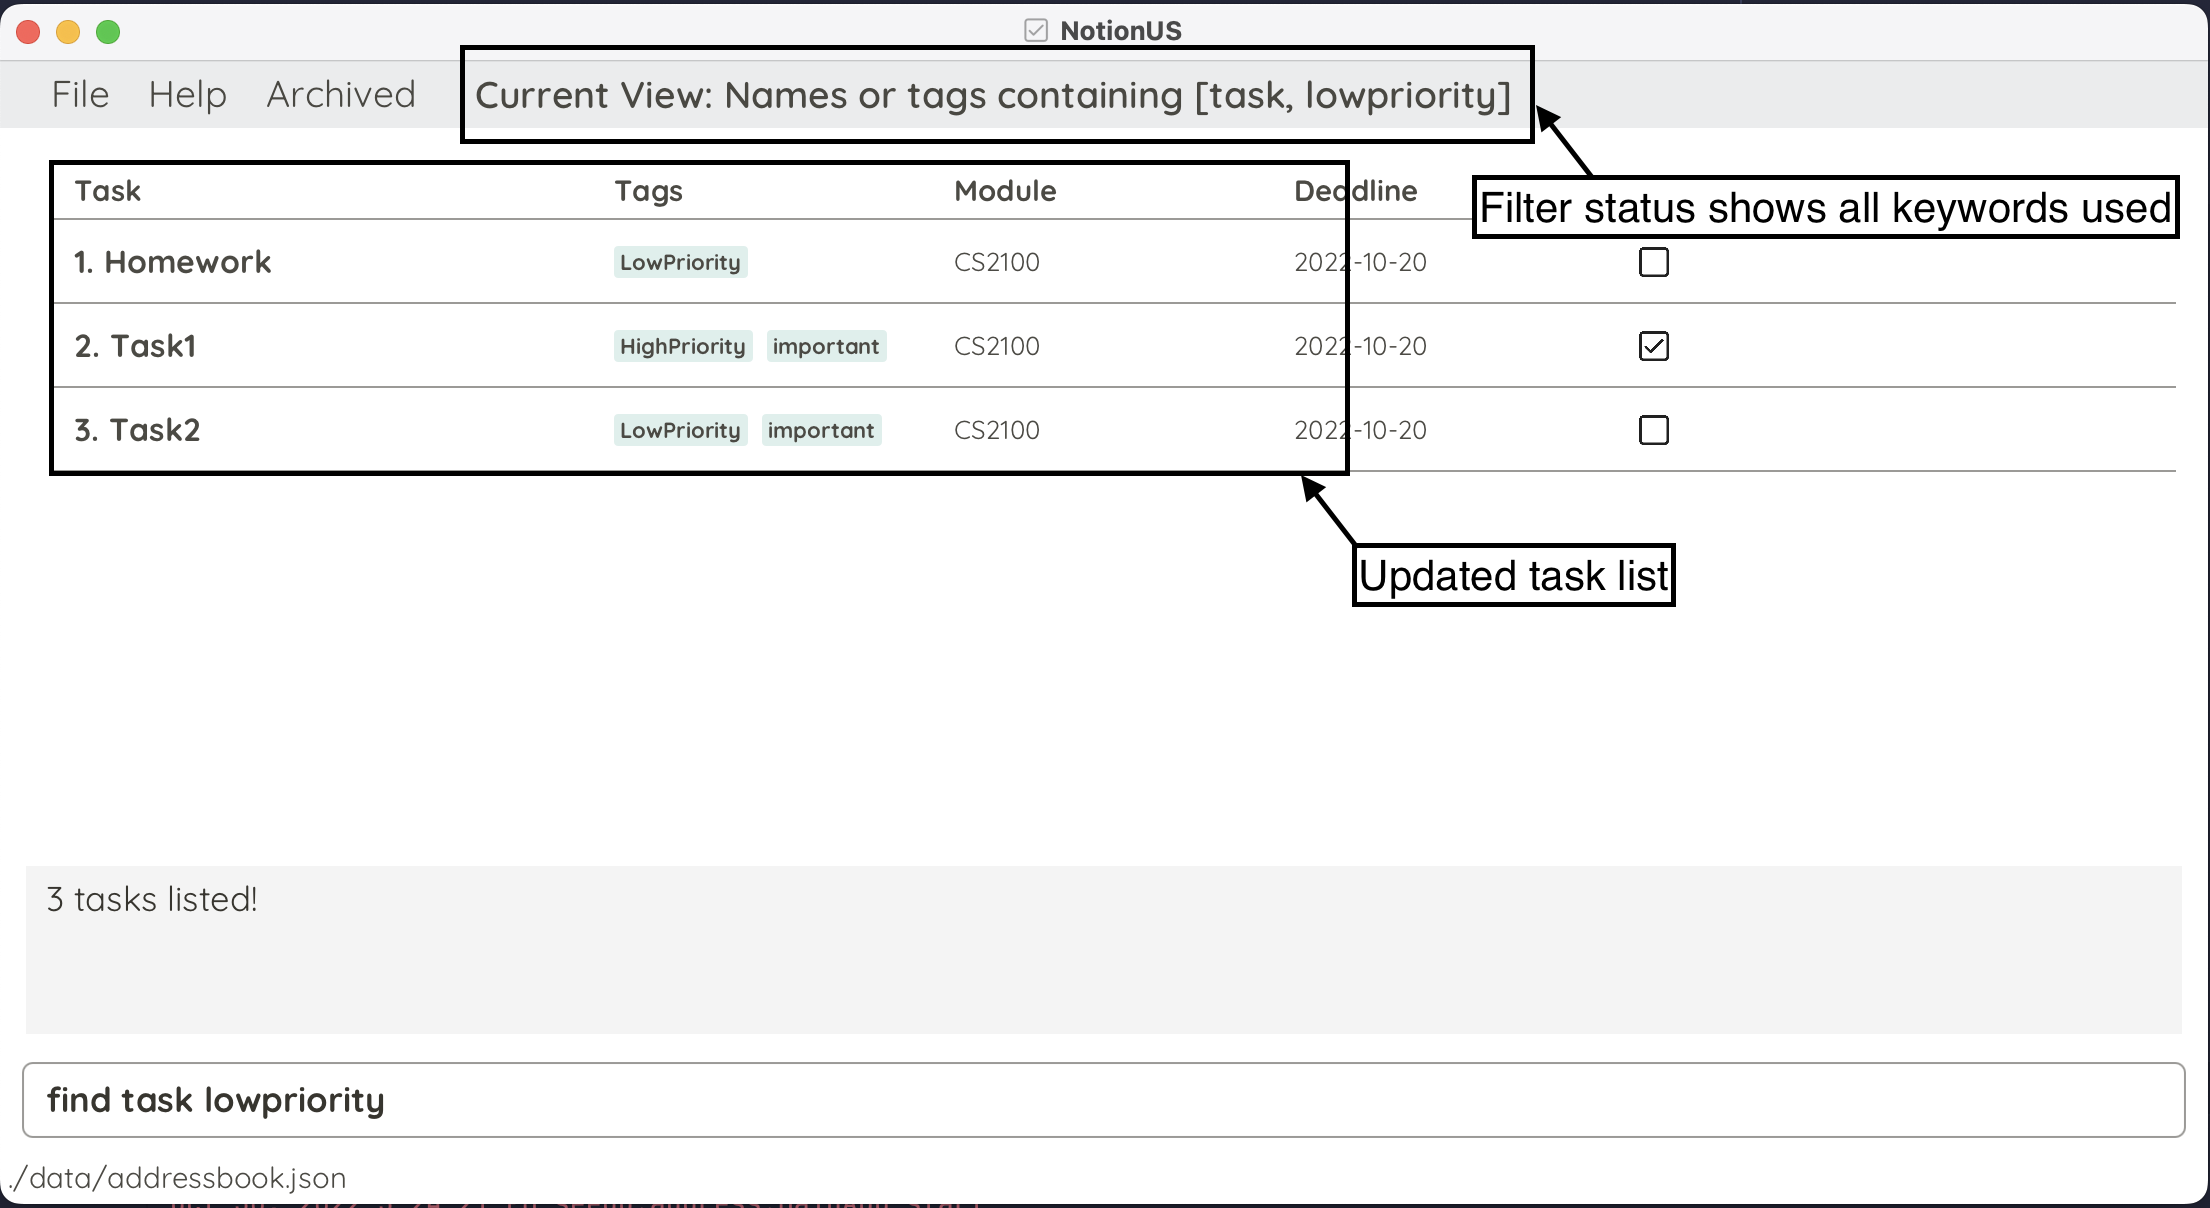
Archive Management
We have the following commands in this section:
Click to return to: Command Features, Back to Top
Archiving tasks : archive
Allows you to remove a task from task list and store in archived file.
Format: archive TASK_NUMBER
-
TASK_NUMBER: This is the number of the task currently displayed.
Examples:
-
archive 1: archives first task in task list.
View archived tasks : showarchive
Displays a list of archived tasks.
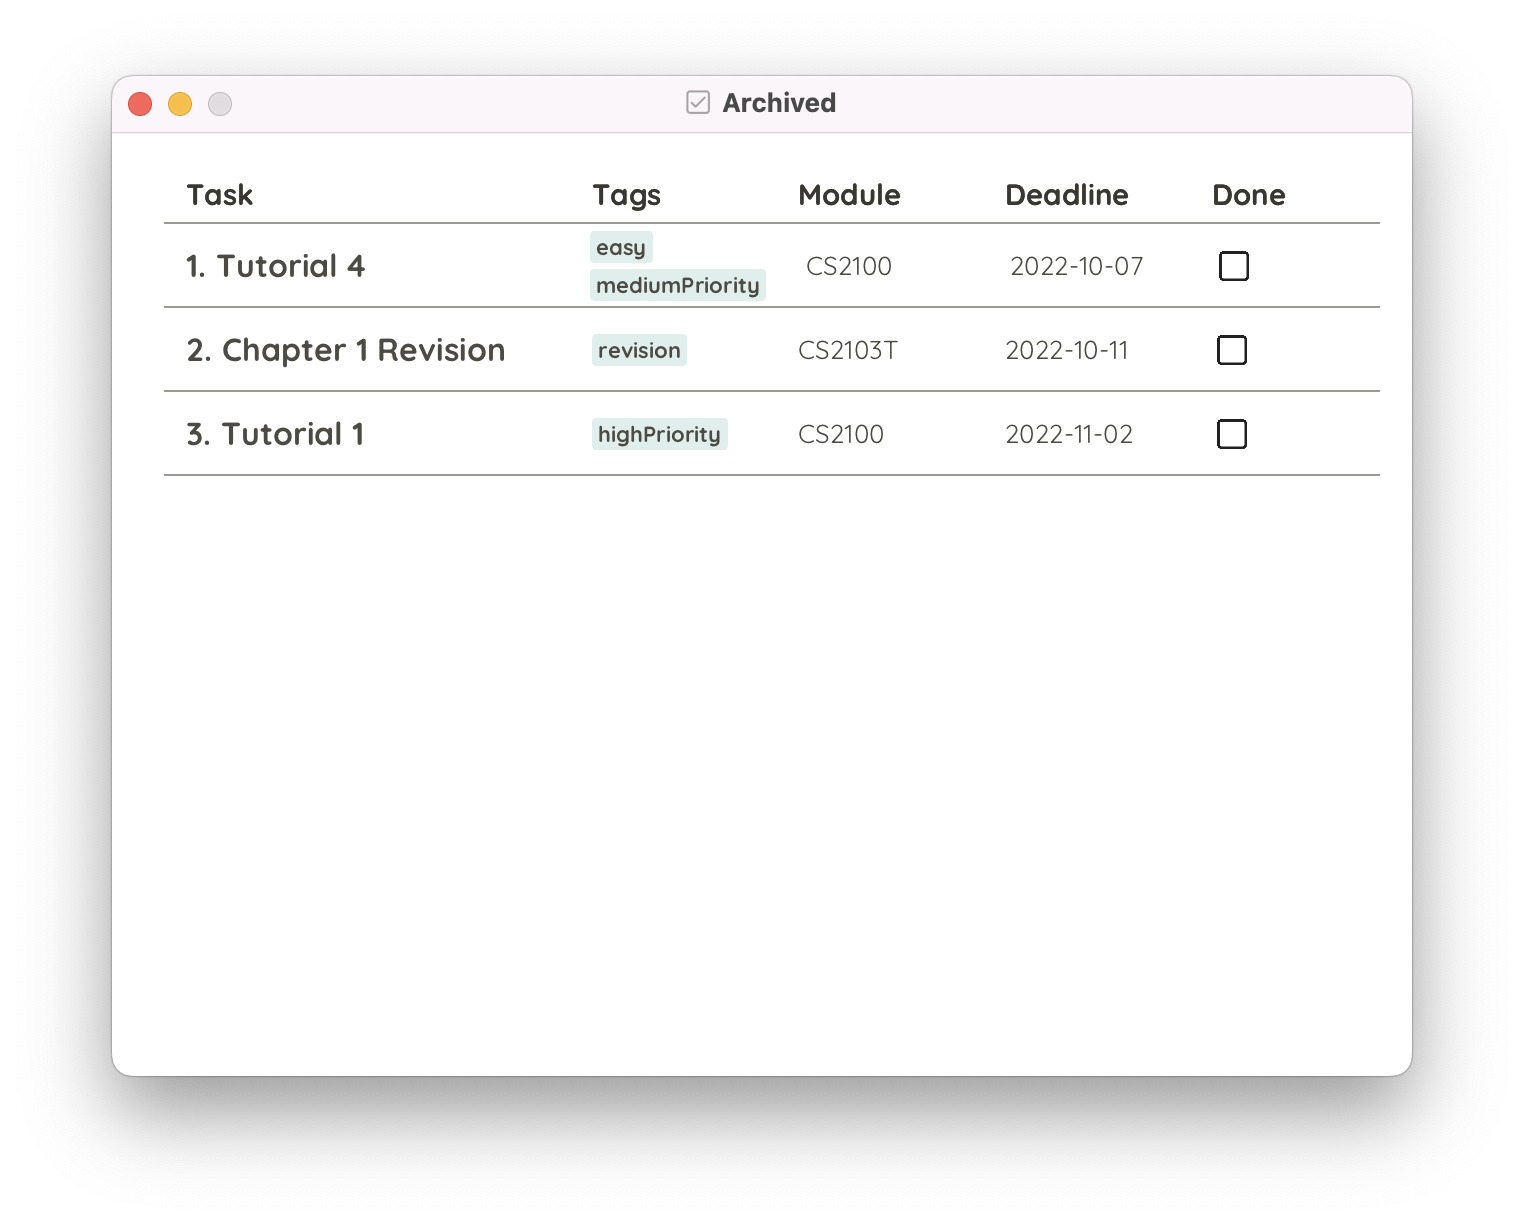
Format: showarchive
Exiting the program : exit
Terminates and exits the program.
Format: exit
Click to return to: Command Features, Back to Top
Other Features
Saving the data
NotionUS data are saved in the hard disk automatically after any command that changes the data. There is no need to save manually.
Editing the data file
NotionUS data are saved as a JSON file [JAR file location]/data/taskList.json. Advanced users are welcome to update data directly by editing that data file.
Click to return to: Back to Top
FAQ
Q: How do I transfer my data in NotionUS to another Computer?
A: Install the app in the other computer and overwrite the empty data file it creates with the file that contains the data of your previous NotionUS home folder.
Q: What if double-clicking fails to open the jar file?
A: Check that the correct version of java is installed (Java 11) locally on your computer. You may open the terminal and type java -version to check. If it is the wrong version, visit this page for a guide to install the correct version of java. If you have the correct version of java installed, you may try to launch the app using terminal, open terminal or command prompt and type java -jar NotionUs.jar.
Q: Is internet needed for NotionUS to work?
A: No, NotionUS functions fully without internet connection.
Q: I need help! How can I contact the team?
A: You may contact us via GitHub issues here. If possible, do provide screenshots demonstrating the problem you are facing. We will assist you as soon as possible!
Click to return to: Back to Top
Command summary
Format meanings:
- Words in
lower_caseare commands or flags to be typed as-is - Words in
UPPER_CASEare values of parameters to be supplied by the user - Words in
[Square brackets]are optional parameters (Note:lscan stack filters) - Words that are followed by
*are parameters that can be used multiple times
| Action | Format | Examples |
|---|---|---|
| Add task | add -n TASK_NAME -m MODULE [-d YYYY-MM-DD] [-t TAG_NAME]* |
add -n Tutorial 3 -m CS2103T -d 2022-09-16 |
| Archive task | archive TASK_NUMBER |
archive 1 |
| Clear all tasks | clear |
|
| Delete task | delete TASK_NUMBER |
delete 3 |
| Edit task | edit TASK_NUMBER [-n NEW_NAME] [-m NEW_MODULE] [-d NEW_DEADLINE] |
edit 1 -n CS2103T ip |
| Exit NotionUS | exit |
|
| Find task/tag with name | find KEYWORD/TAG_NAME* |
find Tutorial Lab |
| Help | help |
|
| List specific tasks |
ls [-a] [-u] [-m] [--module MODULE] [-t TAG_NAME] [-d YYYY-MM-DD] [-n KEYWORD*]ls -a View all tasksls -u View all incomplete tasksls -m View all marked tasksls --module MODULE View tasks under the specific modulels -t TAG_NAME View tasks with a specific tagls -d YYYY-MM-DD View tasks on or after a specific date ls -n KEYWORD* View task names with matching keywords |
ls -n task test --module CS2103T |
| Mark tasks | mark TASK_NUMBER |
mark 2 |
| Show Archived tasks | showarchive |
|
| Tagging a task | tag TASK_NUMBER -t TAG_NAME [-t TAG_NAME]* |
tag 1 -t highPriority -t homework |
| Unmark tasks | unmark TASK_NUMBER |
unmark 2 |
| Accessing previous commands | Use the Up and Down arrow keys |
Click to return to: Back to Top
Glossary
| Word | Definition |
|---|---|
| Command Line Interface (CLI) | A program that mainly uses typed commands to interact with the app. |
| Graphical User Interface (GUI) | What the user sees when interacting with the app. |
| Alphanumeric | A combination of both letters and numbers without space. |
| Terminal | A text-based interface for the computer. |
Click to return to: Back to Top