Developer Guide
Welcome to the NotionUS developer guide!
- 1. Introduction
- 2. Acknowledgements
- 3. Setting up, getting started
- 4. Design
- 5. Implementation
- 6. Documentation, logging, testing, configuration, dev-ops
- 7. Appendix: Requirements
- 8. Appendix: Instructions for manual testing
- 9. Appendix: Effort
1. Introduction
1.1 Purpose
This document describes the architecture and software design decisions for our CLI-based task management app NotionUS. While the document is in general for anyone who wants to understand the system, it is primarily targeted towards the designers, developers and software testers of notionUS.
1.2 Scope
As the goal of this document is to cover and explain the architecture and design decisions, we first discuss the high-level architecture and software design under the “Design” section. Then we go into details of implementation of our features in the “Implementation” section.
2. Acknowledgements
- This project is based on the AddressBook Level-3 created by the SE-EDU initiative.
- The Quicksand font’s Open Font License: Open Font License for Quicksand font
3. Setting up, getting started
Refer to the guide Setting up and getting started.
4. Design
4.1 Architecture
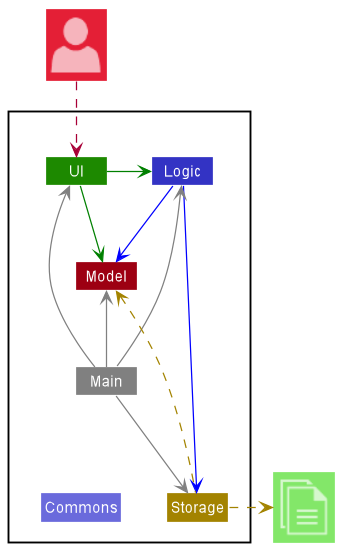
The Architecture Diagram given above explains the high-level design of the App.
Given below is a quick overview of main components and how they interact with each other.
Main components of the architecture
Main has two classes
called Main
and MainApp. It
is responsible for,
- At app launch: Initializes the components in the correct sequence, and connects them up with each other.
- At shut down: Shuts down the components and invokes cleanup methods where necessary.
Commons represents a collection of classes used by multiple other components.
The rest of the App consists of four components.
-
UI: The UI of the App. -
Logic: The command executor. -
Model: Holds the data of the App in memory. -
Storage: Reads data from, and writes data to, the hard disk.
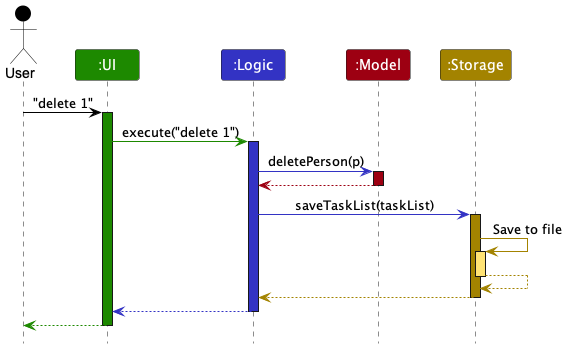
How the architecture components interact with each other
The Sequence Diagram below shows how the components interact with each other for the scenario where the user issues
the command delete 1.
Each of the four main components (also shown in the diagram above),
- defines its API in an
interfacewith the same name as the Component. - implements its functionality using a concrete
{Component Name}Managerclass (which follows the corresponding APIinterfacementioned in the previous point).
For example, the Logic component defines its API in the Logic.java interface and implements its functionality using
the LogicManager.java class which follows the Logic interface. Other components interact with a given component
through its interface rather than the concrete class (reason: to prevent outside component’s being coupled to the
implementation of a component), as illustrated in the (partial) class diagram below.
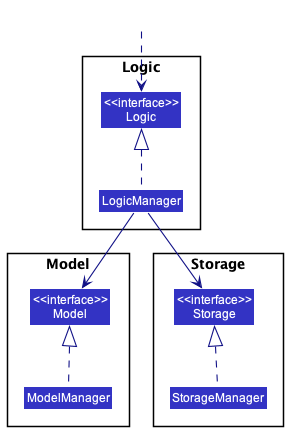
The sections below give more details of each component.
4.2 UI component
The API of this component is specified
in Ui.java
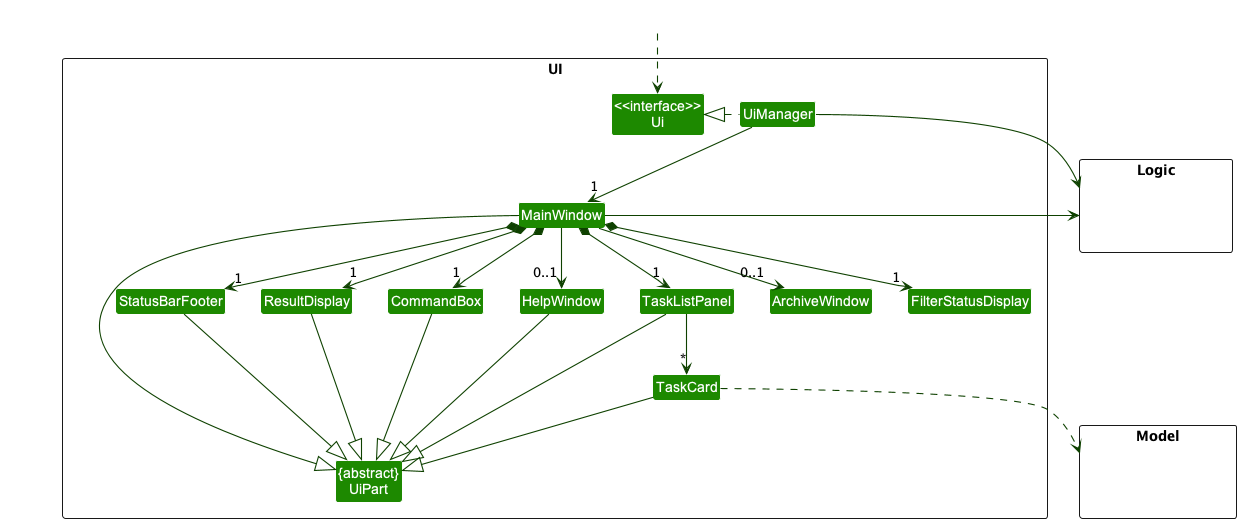
The UI consists of a MainWindow that is made up of parts e.g.CommandBox, ResultDisplay, TaskListPanel
, StatusBarFooter, FilterStatusDisplay etc. All these, including the MainWindow, inherit from the
abstract UiPart class which captures the commonalities between classes that represent parts of the visible GUI.
The UI component uses the JavaFx UI framework. The layout of these UI parts are defined in matching .fxml files that
are in the src/main/resources/view folder, except for MainWindow. The layout of
the MainWindow
is specified
in NotionUSMainWindow.fxml
.
An FXML variable declared in the Java Class must correspond to the fxml component with the same FX ID.
The layout of TaskCard has been edited to fit the look of a task in Notion, especially the behaviour of task cards
when resizing the main window. The CSS of the app is specified
in NotionUS.css.
The UI component,
- executes user commands using the
Logiccomponent. - listens for changes to
Modeldata so that the UI can be updated with the modified task data and if applicable, any filters applied on the tasklist. - keeps a reference to the
Logiccomponent, because theUIrelies on theLogicto execute commands. - depends on some classes in the
Modelcomponent, as it displaysTaskobject residing in theModel.
4.3 Logic component
API : Logic.java
Here’s a (partial) class diagram of the Logic component:
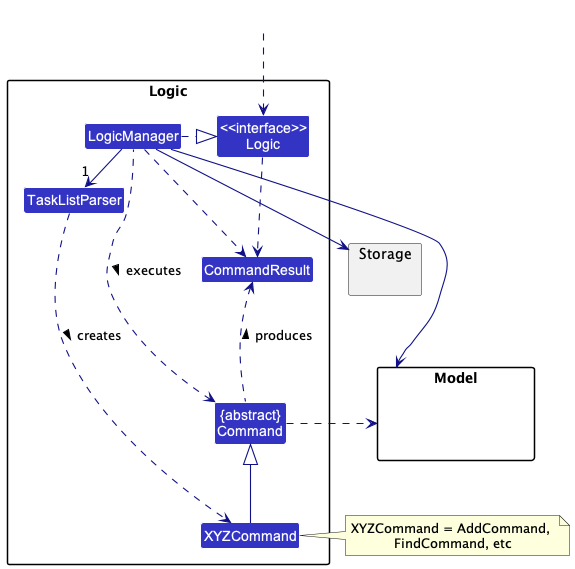
How the Logic component works:
- When
Logicis called upon to execute a command, it uses theTaskListParserclass to parse the user command. - This results in a
Commandobject (more precisely, an object of one of its subclasses e.g.,AddCommand) which is executed by theLogicManager. - The command can communicate with the
Modelwhen it is executed (e.g. to add a task). - The result of the command execution is encapsulated as a
CommandResultobject which is returned fromLogic.
The Sequence Diagram below illustrates the interactions within the Logic component for the execute("delete 1") API
call.
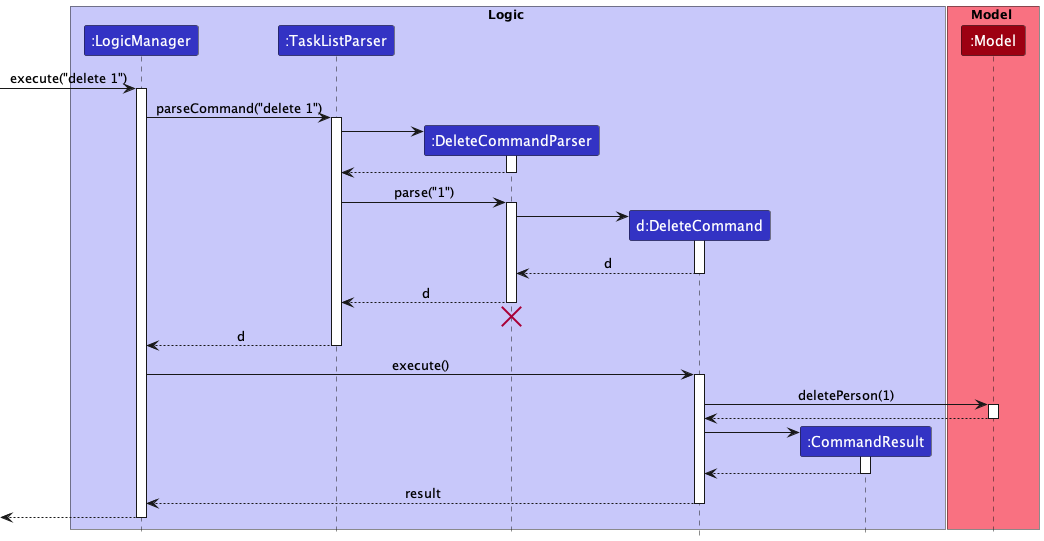
DeleteCommandParser should end at the destroy marker (X) but due to a limitation of PlantUML, the lifeline reaches the end of diagram.
Here are the other classes in Logic (omitted from the class diagram above) that are used for parsing a user command:
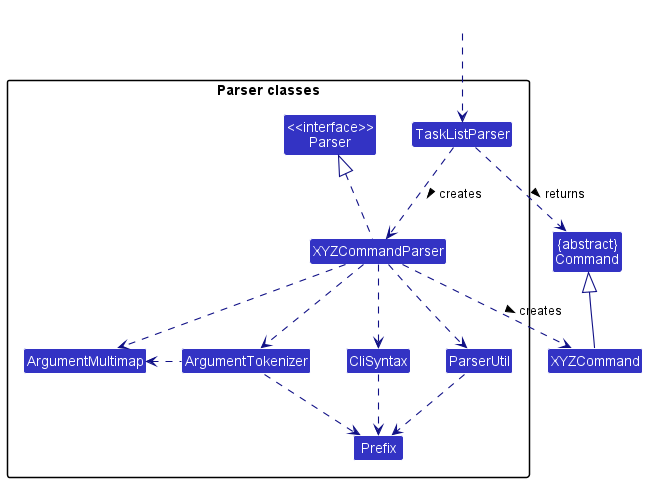
How the parsing works:
- When called upon to parse a user command, the
TaskListParserclass creates anXYZCommandParser(XYZis a placeholder for the specific command name e.g.,AddCommandParser) which uses the other classes shown above to parse the user command and create aXYZCommandobject (e.g.,AddCommand) which theTaskListParserreturns back as aCommandobject. - All
XYZCommandParserclasses (e.g.,AddCommandParser,DeleteCommandParser, …) inherit from theParserinterface so that they can be treated similarly where possible e.g, during testing.
4.4 Model component
API : Model.java
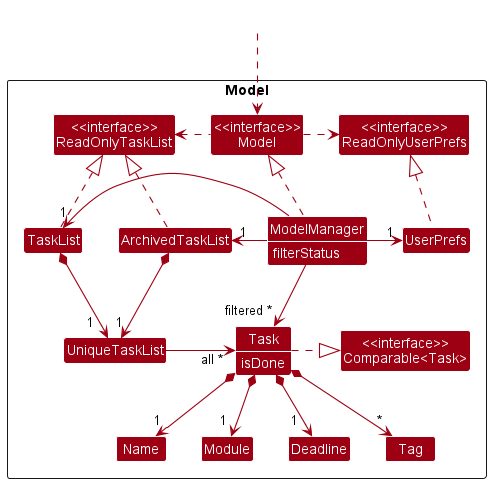
The Model component,
- stores the task list data i.e., all
Taskobjects (which are contained in aUniqueTaskListobject). - stores the currently ‘selected’
Taskobjects (e.g., results of a search query) as a separate filtered list which is exposed to outsiders as an unmodifiableObservableList<Task>that can be ‘observed’ e.g. the UI can be bound to this list so that the UI automatically updates when the data in the list change. - stores the archived
Taskobjects in anotherUniqueTaskListobject. - stores the filter status when the task list is filtered and also updates when the list changes.
- stores a
UserPrefobject that represents the user’s preferences. This is exposed to the outside as aReadOnlyUserPrefobjects. - does not depend on any of the other three components (as the
Modelrepresents data entities of the domain, they should make sense on their own without depending on other components)
For the Task class,
- to support a default sorting of
Taskobjects,Taskimplements theComparable<Task>interface - As
Deadlineis an optional field, their values are stored in anOptionalobject.
4.5 Storage component
API : Storage.java
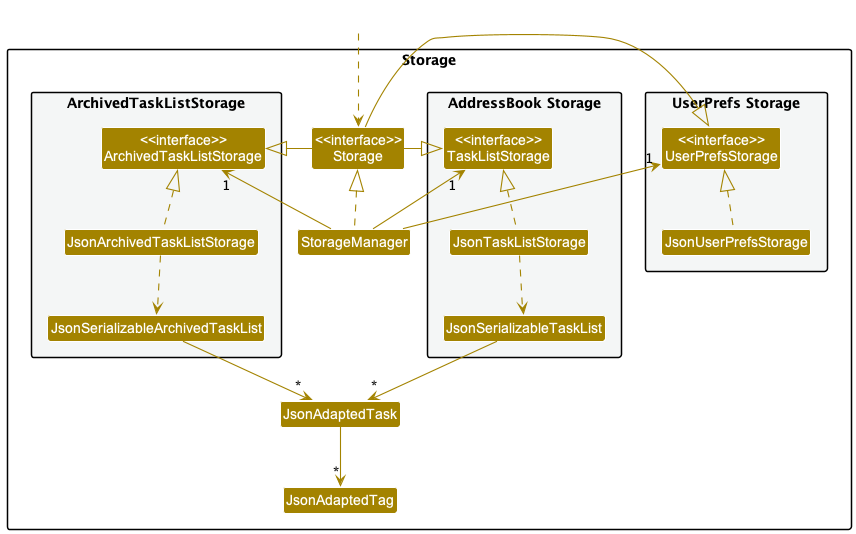
The Storage component,
- can save both address book data and user preference data in json format, and read them back into corresponding objects.
- inherits from both
TaskListStorage,ArchivedTaskListStorageandUserPrefStorage, which means it can be treated as either one (if only the functionality of only one is needed). - depends on some classes in the
Modelcomponent (because theStoragecomponent’s job is to save/retrieve objects that belong to theModel)
4.6 Common classes
Classes used by multiple components are in the seedu.TaskList.commons package.
5. Implementation
This section describes some noteworthy details on how certain features are implemented.
5.1 Archive Command
A user is able to archive a task when a task is completed or has been due. This helps to reduce clutter whenever a user enters the command.
Archived tasks will be stored and can be retrieved using showarchive.
Command takes input
-
archive TASK_NUMBERwhereTASK_NUMBERis the index of the tasks based on the displayed index shown in Main Window.
Command result will if the task is archived successfully. Should there be a duplicate of the same task in the archived task list. The new archived task will be removed from current task list.
Should the TASK_NUMBER entered is out of bound, a generic CommandResult and an error message
will be given. Model will not be updated.
Below is the sequence diagram for an execution of archive TASK_NUMBER, assuming TASK_NUMBER is not out of bound.
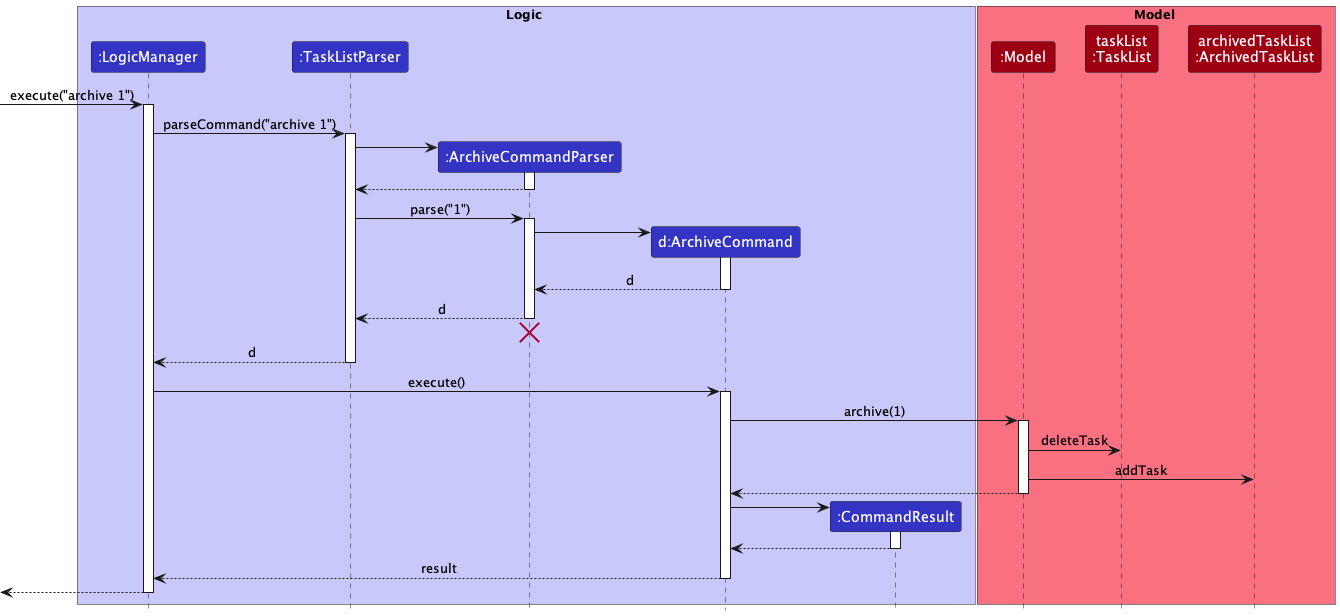
The above sequence diagram shows how the archive command works when user input archive 1 is entered.
It first parses the index of the task to archive to retrieve the task. Next, it removes the task from the task list and adds it to the archived task list.
Archive command is facilitated by the ArchivedTaskList. ArchivedTaskList does not allow the user to modify or edit the tasks stored in archived task list.
The addition of ArchivedTaskList requires a separate storage system for the archived tasks, which forms under ArchivedTaskListStorage.
The .json file for archived task is named as archivedTaskList.json
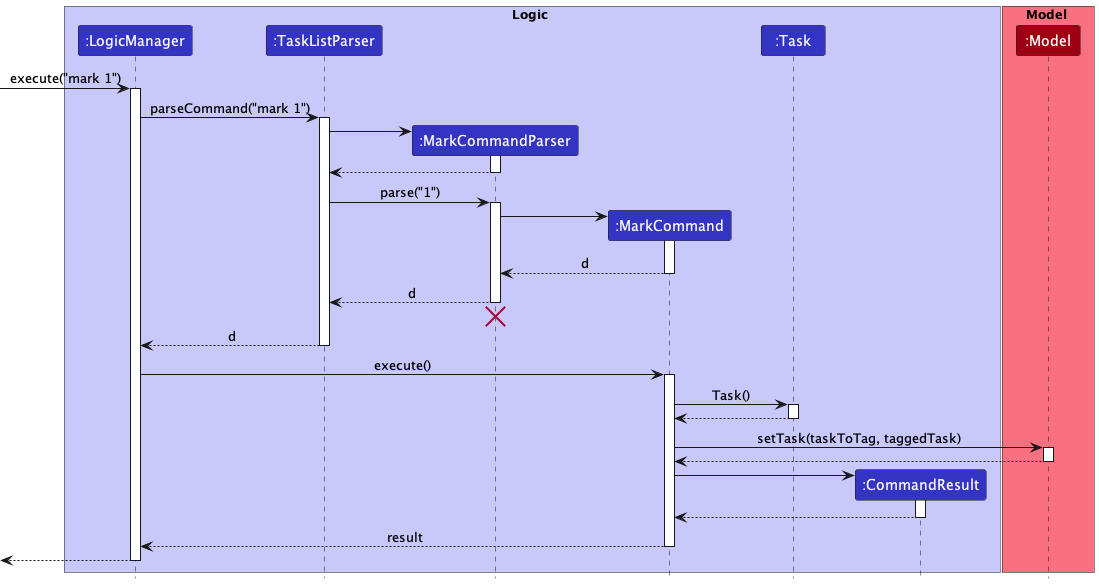
5.2 Mark/unmark feature
Implementation
The mark/unmark feature marks a task in the task list as done/not done respectively. Its mechanism is facilitated
by MarkCommand and UnmarkCommand. They both extend Command, overriding the execute method.
The implementation of mark and unmark is such that a task being marked or unmarked is effectively replaced by an
identical task with a modified isDone field in the task list.
Below is the sequence diagram for an execution of mark <index>, assuming <index> is not out of bounds.
5.3 List feature
5.3.1 Implementation
The list feature filters the displayed task list based on the filters entered by user. Its mechanism is facilitated by ListCommand and ListCommandParser, as well as their subclasses (E.g. ListDeadlineCommand, ListDeadlineCommandParser).
Multiple filters can be applied in a single ListCommand. For example, ls -u --module CS2103T would list all tasks that are unmarked and under the Module “CS2103T”.
ListCommand extends Command, overriding the execute method. To allow for multiple filters, the constructor of ListCommand takes in List<Predicate<Task>>.
The list of predicates will subsequently be reduced into a single predicate.
This table summarizes the respective flags that users can use to apply filters of their choice.
![]() Note:
Words in
Note:
Words in UPPER_CASE are values of parameters to be supplied by the user
| Flag | Effect | Format |
|---|---|---|
-a |
List all tasks | ls -a |
-u |
List all unmarked tasks | ls -u |
-m |
List all marked tasks | ls -m |
--module* |
List all tasks under the same module | ls --module MODULE |
-t* |
List all tasks containing the same tag | ls -t TAG |
-d* |
List all tasks with deadline on or after a date | ls -d DATE |
-n* |
List all task names with the matching keywords | ls -n KEYWORD |
![]() Note:
Flags that are labelled with a
Note:
Flags that are labelled with a * are commands that expect a parameter, as seen in the Format column.
These commands have a corresponding Parser that implements Parser<ListModuleCommand> to parse the parameter passed in. Each Parser implements the parse method in Parser interface. In which, validity checks are conducted.
Example:
- In
ListDeadlineCommandParser, argument is verified to contain only numbers inYYYY-MM-DDformat
This feature uses the following methods from the Model interface:
-
Model#updateFilteredTaskList: Updates the current task list by applying a filter as indicated by the given predicatePredicate<Task>. The GUI will be updated accordingly to display the filtered task list. -
Model#updateFilterStatus: Updates the list of filters that have been applied to the current task list displayed. This will be reflected on the GUI.
5.3.2 Usage scenario
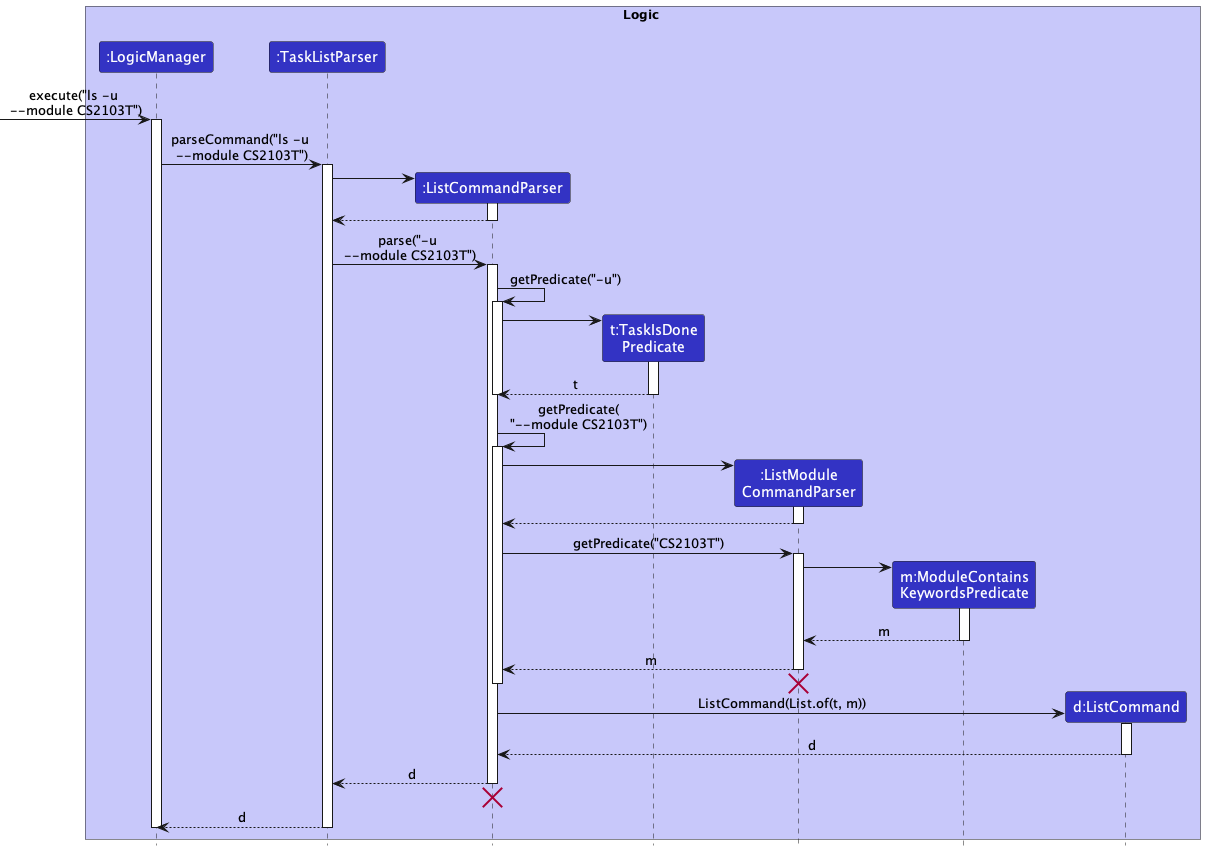
Given below is an example usage scenario and how the mechanism behaves at each step to execute the ls -u --module CS2103T command.
Step 1. The user enters ls -u --module CS2103T to filter out tasks that are unmarked and under the Module “CS2103T”.
Step 2. LogicManager calls the TaskListParser#parseCommand(String) method. A new ListCommandParser object is created and returned.
Step 3. TaskListParser calls the ListCommandParser#parse(String) method. ListCommandParser self-invocates ListCommandParser#getPredicate(String) for each flag found (i.e. -u, --module).
Step 4. ListCommandParser#getPredicate("-u") directly returns an instance of TaskIsDonePredicate as the -u flag does not expect a parameter.
Step 5. Meanwhile, ListCommandParser#getPredicate("--module CS2103T") returns an instance of ListModuleCommandParser as the --module flag expects a parameter, that has to be parsed.
Step 6. ListCommandParser calls ListModuleCommandParser#getPredicate(String) method. A new instance of ModuleContainsKeywordsPredicate is created and returned.
Step 7. A new ListCommand instance is instantiated. Both predicates, TaskIsDonePredicate from Step 4 and ListModuleCommandPredicate from Step 6 are passed into the ListCommand constructor. ListCommand instance is returned to LogicManager.
Below is the sequence diagram for the partial execution of ls -u --module CS2103T up till Step 7.
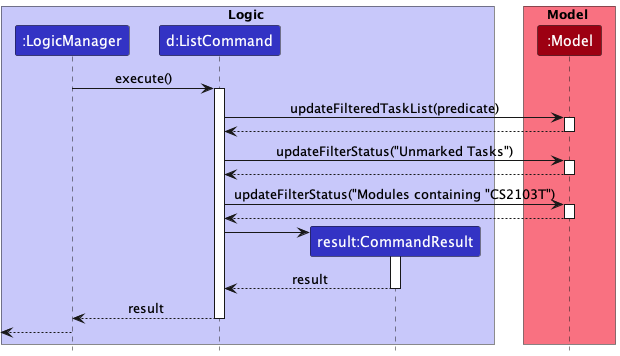
Step 8. LogicManager calls the ListCommand#execute() method.
Step 9. The two predicates passed in are reduced into one predicate. The current taskList is updated by calling Model#updateFilteredTaskList(predicate).
Step 10. Model#updateFilterStatus(String) is called twice to update the list of filters being applied to the current displayed taskList.
Step 11. A new CommandResult object is returned, signifying that command execution was successful.
Below is the sequence diagram for the partial execution of ls -u --module CS2103T from Step 8 to Step 11.
5.4 Find feature
The find feature is similar to the list feature as it is also a filter on the current task list. The find feature finds
any task name that contains the keyword(s) and any tags that match the keyword(s) given.
FindCommand extends Command, overriding the execute method.
This feature uses the following methods from the Model interface:
-
Model#updateFilteredTaskList: Updates the current task list by applying a filter as indicated by the given predicatePredicate<Task>. The GUI will be updated accordingly to display the filtered task list. -
Model#updateFilterStatus: Updates the list of filters that have been applied to the current task list displayed. This will be reflected on the GUI.
5.4.1 Usage Scenario
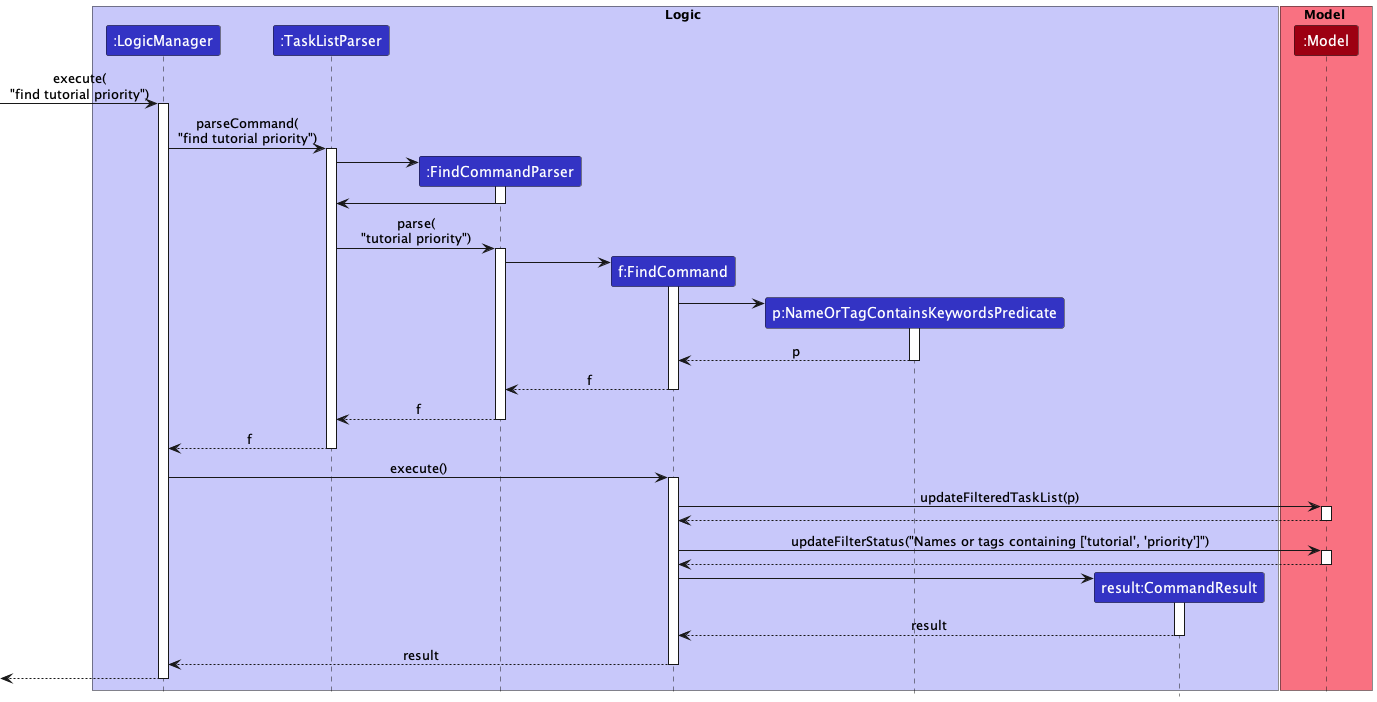
Given below is an example usage scenario and how the mechanism behaves at each step to execute the find tutorial priority command.
Step 1. The user enters find tutorial priority to find all tasks with names containing and tags matching tutorial and priority.
Step 2. LogicManager calls the TaskListParser#parseCommand(String) method. A new FindCommandParser object is created and returned.
Step 3. TaskListParser calls the FindCommandParser#parse(String) method.
Step 4. FindCommandParser#parse(String) returns a new instance of FindCommand with a NameOrTagContainsKeywordsPredicate and returned to LogicManager.
Step 5. LogicManager calls the FindCommand#execute() method.
Step 6. The current taskList is updated by calling Model#updateFilteredTaskList(predicate).
Step 7. Model#updateFilterStatus(String) is called to update the filter being applied to the current displayed taskList.
Step 8. A new CommandResult object is returned, signifying that command execution was successful.
Here is a sequence diagram to represent the execution of the command:
5.5 Returning to a previous command
5.5.1 Implementation
This feature allows the user to traverse through past commands via the up and down keys on the keyboard, similar to how
it works in a terminal.
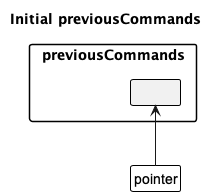
This mechanism of returning to previous commands is facilitated by CommandHistory. It works with CommandBox, storing
entered commands internally in previousCommands and controls the traversal with the aid of pointer.
-
previousCommands– An ArrayList storingStrings -
pointer- Anintvariable that points to aStringinpreviousCommands
Additionally, it implements the following operations:
-
CommandHistory#add(String)– Saves the entered command into the history. -
CommandHistory#up()– Traverses upwards through the history and restores the previously entered command. -
CommandHistory#down()– Traverses downwards through the history and restores the command.
5.5.2 Usage scenario
Given below is an example usage scenario and how the command history traversal mechanism behaves at each step.
Step 1. The user launches the application for the first time. The CommandBox will be initialised, which in turns
initialises the CommandHistory that is contained within. Since command history is empty, previousCommands will be
empty.
Step 2. The user enters a command ls -u. Upon entering a new
command, CommandBox#handleButtonPressed(KeyEvent) is called, which in turn calls CommandHistory#add(String) to
stores this command into previousCommands.
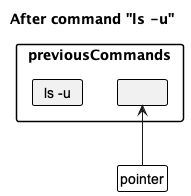
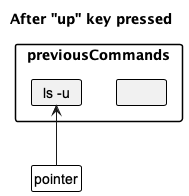
Step 3. The user presses on the up key to return to the previously entered command. This action calls
the CommandHistory#up() which will shift pointer once to the left, pointing it to the previous command in history,
and feeds this String ls -u back to the command box.
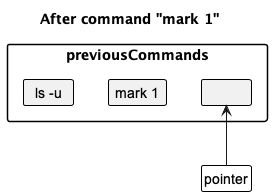
Step 4. The user enters another command mark 1. Through the same mechanism as in Step 1, this command will be stored into previousCommands.
pointer will be reset to the last position.
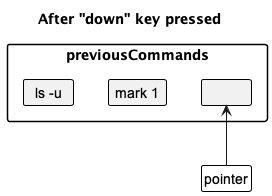
Step 5. The user presses on the down key to traverse down the history. This action calls the CommandHistory#down() method
which will shift pointer once to the right. Since the pointer is pointing outside of the arrayList, there is no command to be restored.
Hence, the command box will be cleared.
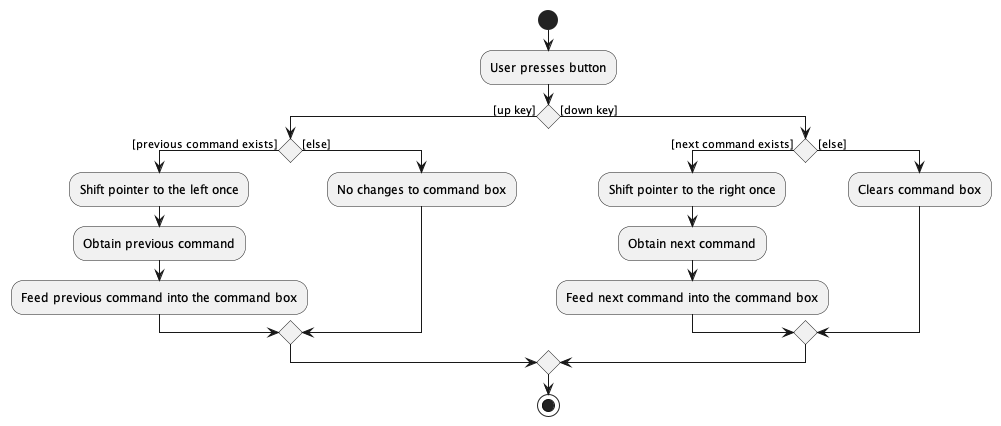
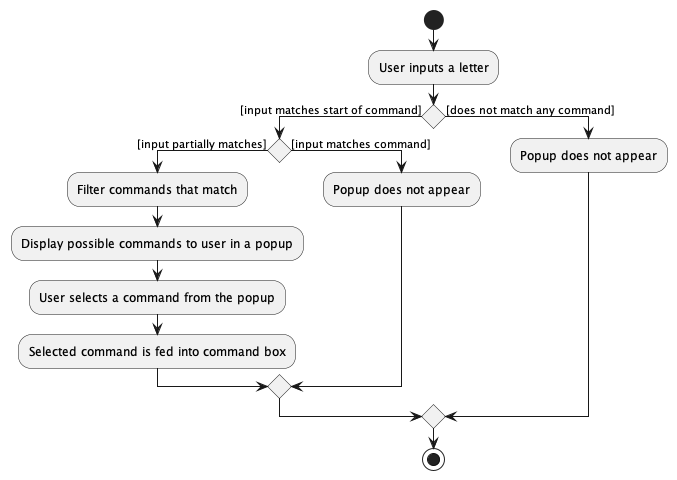
The following activity diagram summarizes what happens when a user clicks on the up/down keys.
5.5.3 Design considerations:
Aspect: How command history is stored:
-
Alternative 1 (current choice): Stores entered commands in an arrayList, renewed everytime the app launches.
- Pros: Easy to implement.
- Cons: Will not be able to restore commands from previous launches.
-
Alternative 2: Stores entered commands into a local
jsonfile.- Pros: Will be able to restore commands from previous launches.
- Cons: Difficult to implement as storage architecture will have to be renewed.
5.6 Command autocomplete feature
5.6.1 Implementation
This feature allows the user to traverse through a drop-down list of possible commands that can be used, and is updated
as they are typing. This provides convenience for the user as he can click Enter to complete the command after
selection.
The mechanism works by firstly having a list of possible commands. This list is then filtered with the condition of whether any of them contain the text that the user is inputting at real-time. This filtered list is then shown as a JXML context menu below the command box.
It adds the following methods in CommandBox.java:
-
CommandBox#handleAutoComplete– Handles the filtering of the command list and showing the suggestions list. -
CommandHistory#populatePopUp– Populates the suggestions list popup with the filtered list.
Below is an example usage scenario for autocomplete:
Step 1. The user opens the app, which initialises the CommandBox which then initialises the ContextMenu and a
CommandList of all the possible commands that be used in the app.
Step 2. The user would like to edit a task that has in NotionUS, and knows that the command begins with an e, typing
it into the command box. A list of possible commands appears as a popup ContextMenu below the
command box, containing the commands of edit and exit.
Step 3. When the popup appears, the user can use the up and down key to traverse the list to the command of choice.
Once the user would like to use that command, the user hits Enter and the command is filled into the command box.
This closes the popup.
Step 4. The user adds the required additional information if required and then hits Enter to perform the command as per normal.
Below is an activity diagram to display how the feature works:
5.6.2 Design considerations:
Aspect: Filtering commandList to find matching commands:
-
Alternative 1: (current implementation) Filters command list down everytime the user input changes.
- Pros: Easy to implement.
- Cons: Inefficient as full list is filtered every time.
-
Alternative 2: Filter the current command list if the start of current input matches start of commands already
in previous list.
- Pros: Harder to implement.
- Cons: Efficient especially when command list is large.
5.7 [Proposed] Acceptance of Multiple Date Formats
5.7.1 Current Implementation
Currently, the Deadline class only accepts dates in the ISO 8601 format (e.g. 2022-11-07), which is unnatural for new
users to type. Accepting multiple date formats will be much appreciated by the user base.
5.7.2 Proposed Implementation
A list of accepted formats generated using DateTimeFormatter::ofPattern needs to be stored as a static field in
Deadline.
Assuming the input is not null, we first do what we are doing currently and parse using LocalDate::parse, checking
for an exception. This will check for the ISO 8601 format. Next, for each accepted format format, we try parsing the
input again using LocalDate.parse(input, format). If all of them fail, then we know that the input is invalid.
One can go further as to allow keying in of dates without the year. In such a case, we will have to use
java.time.MonthDay::parse instead of LocalDate::parse. This, however, presents an issue for our Deadline class as
we are using a LocalDate internally, which requires a year. A solution to this is to assume that the provided
MonthDay refers to a day in the current year. For example, say the current year is 2022, if the user
provides 20/11, the date should be parsed as 20 November 2022.
The following sequence diagram shows what will happen with the proposed implementation of multiple date formats:

5.7.3 Alternative Implementations
Aspect: Providing a year for Month and Day only inputs
- Alternative 1 (mentioned above): The current year is taken
- Pros: Easy to implement
- Cons: The feature may become frustrating to use in December when planning for tasks in Janurary
- Alternative 2: Provide a year such that the resultant date is after the current date.
- For example, if the current date is 20 Nov 2022 and the user provides 10 Nov, the result will be 10 Nov 2023.
- Pros: Resolves the December problem of alternative 1
- Cons: The edge case of 29 February needs to be considered, and putting deadlines before the current date may be more difficult
- Alternative 3: Provide a year such that the resultant date is either three months before or nine months after the current date
- Pros: More user-friendly and is most likely what the user expects when typing the command
- Cons: More complicated implementation
5.8 [Proposed] Aliasing of Commands
5.8.1 Rationale for Feature
As users become more familiar with the command line, some may prefer to have aliases for commonly used commands to
improve their efficiency. For example, instead of typing add -n Project ... every time, a user may prefer to just type
a Project ... to quickly add in a task, where a is an alias for add -n. Other potential uses are aliases for
commonly used list filters, instead of typing the whole command out.
5.8.2 Proposed Implementation
The addition of the alias feature will require the following commands:
- View all current aliases:
alias - Add alias:
alias ALIAS_NAME -c COMMAND_TO_RUN, with a limitation that ALIAS_NAME has no spaces - Delete alias:
unalias ALIAS_NAME
The proposed aliasing mechanism will be facilitated by a AliasList class that encapsulates a HashMap, which
stores the alias name and the command to replace the alias. The AliasList class will be part of the Model component
amd will contain the following methods:
-
AliasList#addAlias(String alias, String command)- Adds an alias -
AliasList#deleteAlias(String alias)- Delete an alias -
AliasList#getCommand(String alias)- Returns the actual command to be run if the provided input is an alias, else it simply returns the input. -
AliasList#listAliases()- Returns a list of aliases
These operations will be exposed in the Model interface as Model::addAlias, Model::deleteAlias,
Model::getCommand and Model::listAliases respectively.
LogicManager will work to ensure that the contents of AliasList is stored persistently on disk.
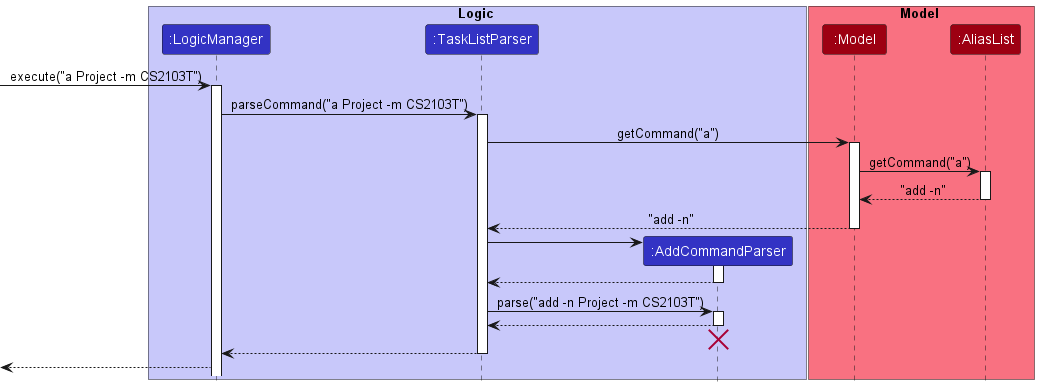
Since aliases can only be one word (by our restriction in the add alias command), we only need the first word of a command to check whether it is an alias. If it is, the alias will be replaced with the actual command to be run.
Below is the sequence diagram for an execution of a Project -m CS2103T, with a being an alias for add -n.
To prevent the alias and unalias commands from being inaccessible due to a bad alias, eg alias alias -c bad, those
two commands cannot be aliased.
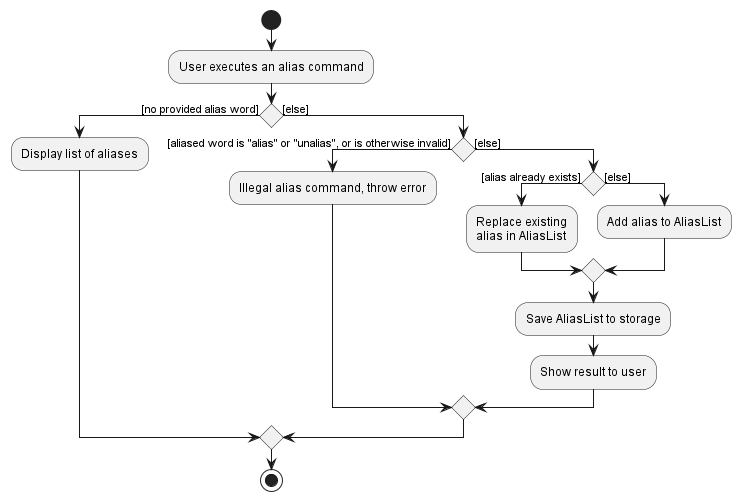
The following activity diagram summarizes what happens when a user executes an alias command:
6. Documentation, logging, testing, configuration, dev-ops
7. Appendix: Requirements
7.1 Product scope
7.1.1 Target user profile:
- tech-savvy
- university student
- has a need to manage tasks from school
- prefer desktop apps over other types
- prefers typing to mouse interactions
- is reasonably comfortable using CLI apps
7.1.2 Value proposition: manage module tasks faster than a typical mouse/GUI driven app and organise them by certain parameters
7.2 User stories
Priorities: High (must have) - * * *, Medium (nice to have) - * *, Low (unlikely to have) - *
Core Functionalities
| Priority | As a … | I want to … | So that I can… |
|---|---|---|---|
* * * |
beginner user | add tasks | keep track of the tasks on hand |
* * * |
beginner user | delete tasks | remove tasks that are no longer relevant |
* * * |
beginner user | tag my tasks to a specific module or commitment | organise them better |
* * * |
beginner user | keep track of deadlines related to added tasks | complete tasks on time |
* * * |
beginner user | mark a task as completed | signify that I have completed that tasks |
* * * |
beginner user | see all the tasks I have that have yet to be completed | easily identify tasks to work on |
* * * |
beginner user | have a help menu and a link to the product guide | learn to navigate by myself |
* * |
potential user | see example tasks that show how the app displays tasks and their statuses | have a better idea of how the app functions |
* * |
beginner user | edit the task names | rectify mistakes |
* * |
familiar user | my tasks have my tasks sorted by due date | easily see which are the most urgent |
* * |
familiar user | see all tasks with names containing a keyword | easily find tasks related to the keyword I am looking have |
* * |
familiar user | see all tasks for a certain deadline | plan ahead and manage my time better |
* * |
familiar user | see all tasks for a certain module | easily see what tasks I have left that is related to that module |
* * |
familiar user | see all tasks that I have completed | easily see what tasks I’ve done |
* * |
familiar user | see all tasks that I have tagged with a certain tag | easily identify tasks related to that tag |
* * |
familiar user | autocomplete my commands | speed up entering commands or see what options I have if I forgot |
* * |
familiar user | toggle up/down to use previously used commands | speed up entering commands if the previous commands are similar to the command I would like to use next |
* * |
student | have my tasks presented in an intuitive way | view all my tasks at a glance |
* * |
student | quickly put in recurring homework | spend less time keying in a recurring homework that is due every week |
* * |
long time user | clear all tasks | remove all tasks so that I can begin a new task list for a new semester |
* * |
long time user | archive my tasks | remove it from my current task list but be able to view them if I wish to |
* * |
long time user | open my archived tasks | view all my archived tasks when I wish to |
* * |
long time user | have a channel to report bugs | help the developers in making a better experience for others using the app |
* * |
long time user | archive my tasks | remove it from my current task list but be able to view them if I wish to |
* * |
long time user | save my tasks as a local file | keep them or transfer them between computers |
* * |
long time user | save my archived tasks | keep them or transfer them between computers |
* |
long time user | be able to create shortcuts for certain actions | save time on frequently performed actions on tasks |
* |
busy student | receive reminders on tasks that are nearing their due date | keep track of them in case I forget |
* |
busy student | have overdue tasks be coloured differently | so I can easily differentiate them and catch up on what I missed |
* |
student with friends taking the same module | be able to add friends | view the tasks they have |
* |
student with friends taking the same module | tag friends onto tasks | keep track of common tasks together with them |
* |
student with friends taking the same module | share my tasklist with them | share what tasks I have at any point in time |
* |
student without friends taking the same module | be able to find friends taking the same module | make friends with people taking the same module and keep track of tasks together |
* |
student with commitments other than school | have two separate task lists | separate my other commitments from school work |
* |
bored user | change the appearance of NotionUS | make the app more interesting to use |
* |
student that uses calendar apps | sync the tasks to my calendar | keep track of my tasks even when not using NotionUS |
7.3 Use cases
Unless specified otherwise, the System is the NotionUS application and the Actor is the user.
Use Case: UC1 - Add a task
MSS:
- User requests to add a task into the task list.
-
NotionUS adds task into task list and displays it.
Use case ends.
Extensions:
- 1a. User does not provide the required information for the task.
-
1a1. NotionUS shows an error, requesting the user re-enter their task.
Use case ends.
-
Use Case: UC2 - Edit a task
MSS:
- User finds the ID associated with the task he wants to edit.
- With the task ID, user requests to edit the task.
-
NotionUS edits the task and displays it.
Use case ends.
Extensions:
- 2a. User provides an invalid ID.
-
2a1. NotionUS shows an error, requesting the user check the task ID.
Use case starts from 1.
-
- 2b. User does not provide any changes.
-
2b1. NotionUS provides a note that nothing was changed.
Use case ends.
-
Use Case: UC3 - Delete a task
MSS:
- User finds the ID associated with the task he wants to delete.
- With the task ID, user requests to delete the task.
-
NotionUS deletes the task and updates the view.
Use case ends.
Extensions:
- 2a. User provides an invalid ID.
-
2a1. NotionUS shows an error, requesting the user check the task ID.
Use case starts from 1.
-
Use Case: UC4 - Tag a task
MSS:
- User finds the ID associated with the task he wants to tag.
- With the task ID, user requests to tag the task with a specified task.
-
NotionUS adds the specified tag to the task and displays it.
Use case ends.
Extensions:
- 2a. User provides an invalid ID.
-
2a1. NotionUS shows an error, requesting the user check the task ID.
Use case starts from 1.
-
Use Case: UC5 - Mark a task as done
MSS:
- User finds the ID associated with the task he wants to mark as done.
- With the task ID, user requests to mark the task as done.
-
NotionUS marks the specified task as done.
Use case ends.
Extensions:
- 2a. User provides an invalid ID.
-
2a1. NotionUS shows an error, requesting the user check the task ID.
Use case starts from 1.
-
Use Case: UC6 - Mark a task as not done
MSS:
- User finds the ID associated with the task he wants to mark as not done.
- With the task ID, user requests to mark the task as not done.
-
NotionUS marks the specified task as not done.
Use case ends.
Extensions:
- 2a. User provides an invalid ID
-
2a1. NotionUS shows an error, requesting the user check the task ID
Use case starts from 1.
-
Use Case: UC7 - Find a task with a keyword
MSS:
- User requests a global search with a specified keyword.
-
NotionUS updates the displayed task list with the tasks with attributes that contain the keyword.
Use case ends.
Extensions:
- 2a. User provides a keyword that does not exist in any task.
-
2a1. NotionUS displays an empty page.
Use case ends.
-
Use Case: UC8 - Filter displayed tasks with specified attributes
MSS:
- User requests a filter with one or more specified attributes.
-
NotionUS updates the displayed task list with the tasks that contain the specified attributes.
Use case ends.
Extensions:
- 2a. User provides an attribute or a set of attributes that no task fulfills.
-
2a1. NotionUS displays an empty page.
Use case ends.
-
Use Case: UC9 - Archive a task
MSS:
- User finds the ID of the task he wants to archive.
- With the task ID, user requests to archive the task.
-
NotionUS archives the task, removing it from the displayed task list and adds it to the archive.
Use case ends.
Extensions:
- 2a. User provides an invalid ID.
-
2a1. NotionUS shows an error, requesting the user check the task ID.
Use case starts from 1.
-
- 2b. There are no tasks in the task list.
-
2b1. No tasks to archive.
Use case ends.
-
Use Case: UC10 - Show archived tasks
MSS:
- NotionUS shows all tasks.
- User requests to show the archived tasks.
-
NotionUS displays the archived tasks.
Use case ends.
Extensions:
- 2a. No task has been archived.
-
2a1. NotionUS displays an empty page.
Use case ends.
-
Use Case: UC11 - Clear all tasks
MSS:
- User requests to clear all tasks.
-
NotionUS deletes all tasks, displaying an empty task list.
Use case ends.
Use Case: UC12 - Autocompleting commands
MSS:
- User wants to find a command for listing marked tasks.
- User types
lin the command box. - NotionUS displays a popup menu displaying the possible commands that begin with
l. - User uses the arrow keys to select through the possible commands.
-
User clicks enter to fill the command box with the highlighted command.
Use case ends.
Extensions:
- 2a. User uses a letter that does not match any commands.
-
2a1. NotionUS does not display a popup.
Use case ends.
-
- 2b. User inputs a command that matches a command in the popup.
-
2b1. NotionUS closes the popup as suggestions are not required.
Use case ends.
-
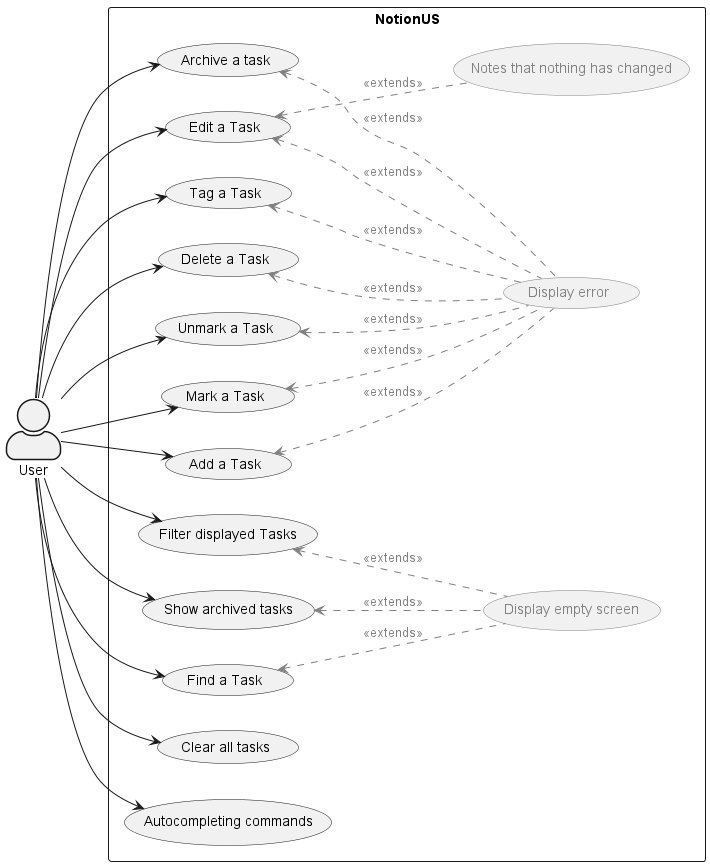
Below is a use case diagram summarising the use cases listed above:
7.4 Non-Functional Requirements
- Should work on any mainstream OS as long as it has Java 11 or above installed. (compatibility)
- Should be able to hold up to 1000 users without a noticeable lag in performance for typical usage. (performance)
- Should have a response time less than or equal to 5 seconds given any command. (Performance)
- Should take less than 2GB of memory while in operation. (Performance)
- A user with above average typing speed for regular English text (i.e. not code, not system admin commands) should be able to accomplish most of the tasks faster using commands than using the mouse. (Usability)
- The error rate of the commands entered by the user should not exceed 5%. (Usability)
- Should take a user less than 1 day to familiarise with all the main commands used for the application. (Usability - learnability)
- A user who returned to the interface after stopping for some time should be able to use the application efficiently right away. (Usability - memorability)
- Should provide a pleasant user experience and a high user satisfactory level. (Usability - satisfaction)
- Should not face any error or system failure 95% of the time. (Reliability)
- Should support the use of the UK English language. (Localisation)
- Should be available to users 99% of the time. (Availability)
- Maintenance should not take up more than 20 minutes when an error is encountered. (Maintainability)
- Should be easily moved from one computing environment to another without any change in its behaviour or performance. i.e. should not require an installer. (Portability)
- Should take less than 2GB of storage space.
- Data should be stored locally in the user’s operating device.
7.5 Glossary
- Mainstream OS: Windows, Linux, Unix, OS-X
- Tag: A user created tag that is linked to a task
8. Appendix: Instructions for manual testing
Given below are instructions to test the app manually.
8.1 Launch and shutdown
-
Initial launch
-
Download the jar file and copy into an empty folder
-
Double-click the jar file Expected: Shows the GUI with a set of sample contacts. The window size may not be optimum.
-
-
Saving window preferences
-
Resize the window to an optimum size. Move the window to a different location. Close the window.
-
Re-launch the app by double-clicking the jar file.
Expected: The most recent window size and location is retained.
-
8.2 Adding a task
-
Adding a task while all tasks are being shown
-
Prerequisites: List all tasks using the
ls -acommand. Multiple tasks in the list. -
Test case:
add -n Tutorial 1 -m CS2100 -t mediumPriority -d 2022-10-20
Expected:Tutorial 1is added into the list. Details of the added task shown in the status message.Tutorial 1is inserted into an index according to its deadline. -
Test case:
add -n PYP -m CS2100 -t finals
Expected:PYPis added into the list. Details of the added task shown in the status message.PYPis inserted behind all other tasks that contain a deadline.
-
-
Adding a task while only unmarked tasks are being shown
-
Prerequisites: List all tasks using the
ls -ucommand. Multiple tasks in the list. -
Test case:
add -n Tutorial 1 -m CS2100 -t mediumPriority -d 2022-10-20
Expected:Tutorial 1is added into the list. Details of the added task shown in the status message. “Current View” of task list is reset to show all tasks.Tutorial 1is inserted into an index of the task list according to its deadline.
-
8.3 Deleting a task
-
Deleting a task while all tasks are being shown
-
Prerequisites: List all tasks using the
ls -acommand. Multiple tasks in the list. -
Test case:
delete 1
Expected: First task is deleted from the list. Details of the deleted task shown in the status message. Task IDs of remaining tasks updated. -
Test case:
delete 0
Expected: No task is deleted. Error details shown in the status message.
-
-
Deleting a task while only tasks due after or on
2022-10-11are being shown-
Prerequisites: List tasks using the
ls -d 2022-10-11command. Multiple tasks in the list. -
Test case:
delete 1
Expected: First task is deleted from the filtered list. Details of the deleted task shown in the status message. Task IDs of remaining tasks updated. -
Test case:
delete 0
Expected: No task is deleted. Error details shown in the status message. -
Other incorrect delete commands to try:
delete,delete x,...(where x is larger than the list size)
Expected: Similar to previous.
-
8.4 Marking a task
- Marking a task while all tasks are being shown.
- Prerequisites: List all tasks using the
ls -acommand. Multiple tasks in the list. -
Test case:
mark 1
Expected: First task is mark, the checkbox of the task will be ticked. Details of the marked task shown in the status message. Task IDs of remaining tasks updated. - Test case:
mark 0
Expected: No task is marked. Error details shown in the status message.
- Prerequisites: List all tasks using the
8.5 Archiving a task
- Archiving a task while all tasks is shown.
- Prerequisites: List all tasks using the
ls -acommand. Multiple tasks in the list. -
Test case:
archive 1
Expected: First task is archived, deleted from the list and added to the archived list. Details of the archived task shown in the status message. Task IDs of remaining tasks updated. - Test case:
archive 0
Expected: No task is archived. Error details shown in the status message.
- Prerequisites: List all tasks using the
8.6 Saving data
-
Dealing with corrupted data files
-
Open
taskList.json. There are some preloaded tasks in this file. -
In line 2, change
taskstotask. This corrupts the file and system will recognise the mismatch. -
Launch NotionUS by double-clicking the jar file.
Expected: No tasks will be shown on the GUI. -
Add a new task by entering
add -n Tutorial 1 -m CS2100
Expected: Task will be added into empty task list. Now, task list contains 1 task. -
Open
taskList.jsonagain.
Expected: Tasks that were present prior to the corruption are now gone. Task list contains only one task (Tutorial 1).
-
-
Dealing with missing data files
-
Open
taskList.json. There are some preloaded tasks in this file. -
Delete
taskList.jsonmanually. -
Follow Steps 3-5 of the above “Dealing with corrupted data files”. Expected behaviour is the same.
-
8.7 Loading saved data
-
Restoring task list from previous launch
-
Launch NotionUS by double-clicking the jar file. Clear the current task list by entering
clear. -
Prerequisites: List all tasks using the
ls -acommand. Task list is empty. - Add 2 tasks into the task list by entering the following commands:
add -n Tutorial 1 -m CS2103T -d 2022-11-29-
add -n PYP -m CS2101Expected: Task list displayed contains 2 tasks.
-
Exit NotionUS by entering
exitor closing the window. - Relaunch NotionUS by double-clicking the jar file.
Expected: Task list displayed contains 2 tasks,
Tutorial 1andPYP.
-
9. Appendix: Effort
For the effort, we felt that our group have placed more than the average. We dissected and analysed the problem of our target audience. From there, we generated an extensive list of user stories to decide on the features to be included in our application.
Our group morphed the model from Person to Task, the challenging part is to refactor all the various classes and fields. We also had to change of the various syntax of module, Deadline etc.
This caused a lot of test cases to fail which we have to fix. For Deadline, we took the extra effort to make it optional to improve the usability for our users.
Another challenge that was faced was understanding the LogicManager and ModelManager as we add in more commands. This requires us to apply the OOP principle and read up on the various APIs that we are
not familiar with such as ObservableList.
While we were adding the archive command, we have added a separate storage file for the ArchivedTaskList to separate it from the current task list as we do not want it to be modified or changed at this stage.
A lot of time was taken to understand how the addressBook storage works such as how the JSON file was created and saved. Due to creation of the new ArchiveTaskList class, we have to add in new methods to LogicManager and ModelManager and
the relevant interfaces, which resulted in many existing test cases to fail.
For the UI, we took the extra effort to change the appearance so that it is easy on the eyes. Since we did not have much experience dealing with CSS files and JavaFx, and on top of that it was different from what we have learnt, hence we had read up and try for ourselves. Experimenting with the various fonts and editing size of the windows and make changes to fit in our new features was foreign to us as well, which caused us extra time to tackle it.